GCP Onboarding Guide
This guide will walk you through onboarding your GCP account for CloudYali Cost Management and Resource Inventory. This process involves exporting GCP billing data to BigQuery and allowing CloudYali access to that data for cost analysis, plus enabling resource inventory for complete visibility.
This guide includes setup for GCP Resource Inventory, which automatically discovers and tracks all your GCP resources using the Cloud Asset Inventory API. No separate setup is required!
Prerequisites
Before starting the onboarding process, make sure you have:
- A GCP account with Organization Administrator and Organization Role Administrator roles.
- An active Cloud Billing Account.
- A GCP project to contain the cloud billing export data. We recommend naming it something descriptive like
cloudyali-realtime-integration. - A BigQuery dataset to store the billing information.
- Cloud Billing Export enabled for detailed billing data.
For organization-wide cost and inventory collection, permissions must be granted at the organization level, not just at the project level. This allows CloudYali to discover all projects and resources across your organization.
Permissions Needed:
- Permission to create a project.
- Permission to create a BigQuery dataset.
- Billing Account Administrator role for the Cloud Billing account.
- BigQuery User role for the project that contains the BigQuery dataset.
- Viewer role at the organization level for read-only access to all projects.
- BigQuery Job User role for the project to run queries on BigQuery datasets.
- BigQuery Data Viewer role for the project to view BigQuery dataset data.
- recommender.resources.export permission at the organization level to allow export of recommendations to BigQuery (required at the organization level corresponding to the export setup).
- Cloud Asset Viewer role at the organization level for resource inventory (included in service account setup below).
Onboarding Steps
Step 1: Create a Host Project
Create a GCP project to host all your billing data:
- Go to the GCP Console and create a new project named
cloudyali-realtime-integration. - Link the project to the Cloud Billing account you want to use for billing export.
- Click the menu icon on the top-left corner and navigate to Billing.
- If the project has no billing account, click Link A Billing Account.
- Select the billing account you would like to associate the project with from the dropdown box.
- Enable Required APIs (for Resource Inventory and Organization Detection):
APIs must be enabled in the project where your service account is created/used (e.g., cloudyali-realtime-integration). This is the only project where you need to enable these APIs for organization-wide scanning.
Using GCP Console:
- Go to APIs & Services > Library
- Ensure the correct project is selected (e.g.,
cloudyali-realtime-integration) - Search for "Cloud Asset API" and click Enable
- Search for "Cloud Resource Manager API" and click Enable (usually enabled by default)
Using gcloud CLI (alternative):
# Enable Cloud Asset API (required for resource inventory)
gcloud services enable cloudasset.googleapis.com --project=cloudyali-realtime-integration

# Enable Cloud Resource Manager API (for organization detection - usually already enabled)
gcloud services enable cloudresourcemanager.googleapis.com --project=cloudyali-realtime-integration
After enabling APIs, it may take 15-20 minutes for permission changes to fully propagate. If you encounter permission errors immediately after enabling, wait a few minutes and try again. See Troubleshooting for force-refresh commands.
If you have multiple billing accounts, you will need to enable Cloud Billing exports individually on each account.
Step 2: Create a Service Account
From the dropdown menu on the top, switch to the organization's view. You must be at the organization's view to set up organization-wide permissions for the service account.
For organization-level cost and inventory collection, the service account roles must be granted at the organization level, not just at the project level. This allows CloudYali to discover all projects and resources across your entire organization.
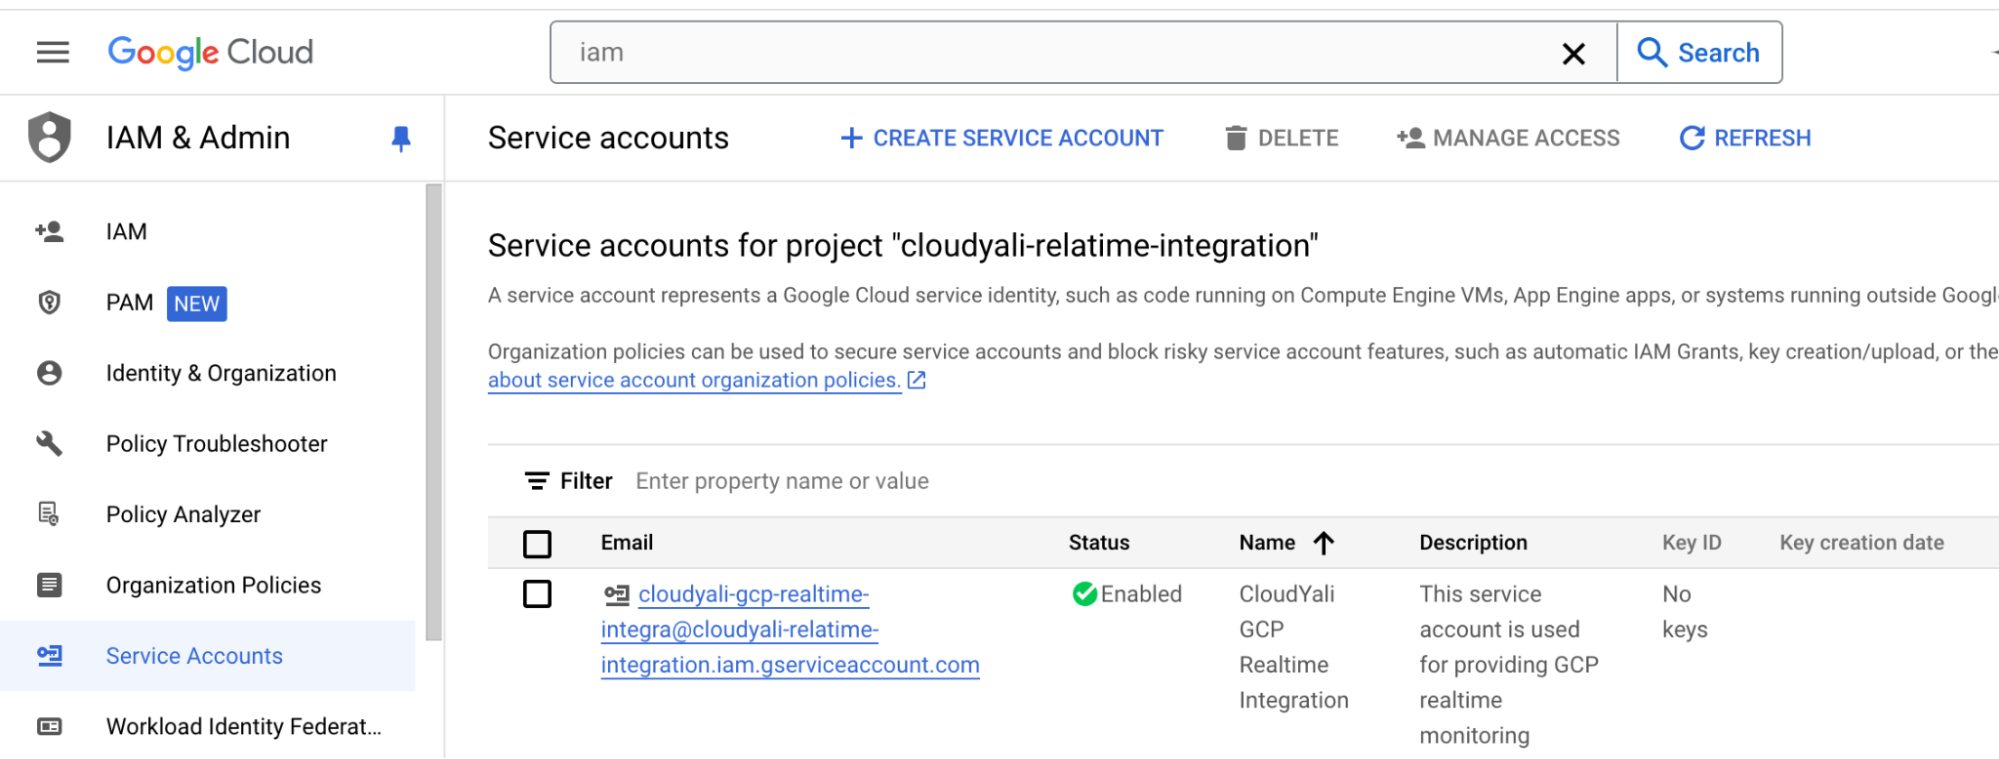
- Navigate to IAM & Admin > Service Accounts.
- Click Create Service Account and name it
CloudYali GCP Realtime Integration. Add appropriate description, e.g.,This Service Account is used for CloudYali real-time cost monitoringas the Service account description. - Click on CREATE AND CONTINUE
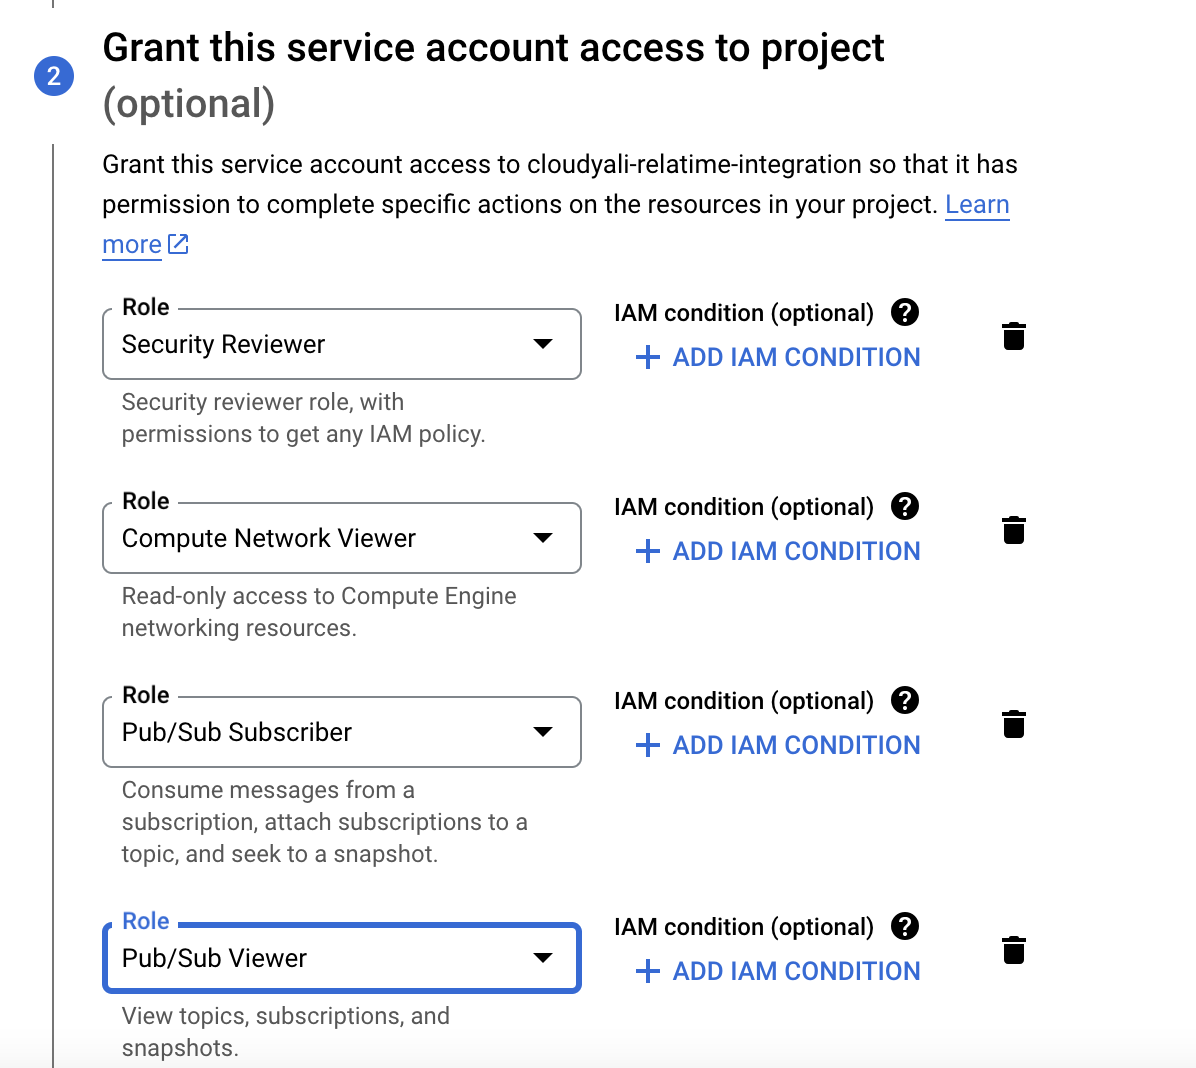
- Assign the following roles:
- Pub/Sub Subscriber
- Pub/Sub Viewer
- Security Reviewer
- Compute Network Viewer
- Cloud Asset Viewer (enables Resource Inventory feature)
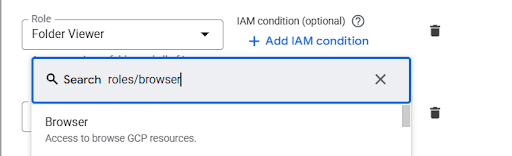
- Browser (enables organization and project discovery)
By adding the Cloud Asset Viewer and Browser roles, you're enabling:
- GCP Resource Inventory - CloudYali discovers and tracks all your GCP resources automatically
- Organization Detection - CloudYali can see all projects in your organization for complete visibility
See GCP Resource Inventory for more details on supported resource types.
- Note the email address of the service account you just created (CloudYali GCP Realtime Integration). Click on the menu icon (3 dots) under the action column for the service account that was just created and click on “Create Key”.
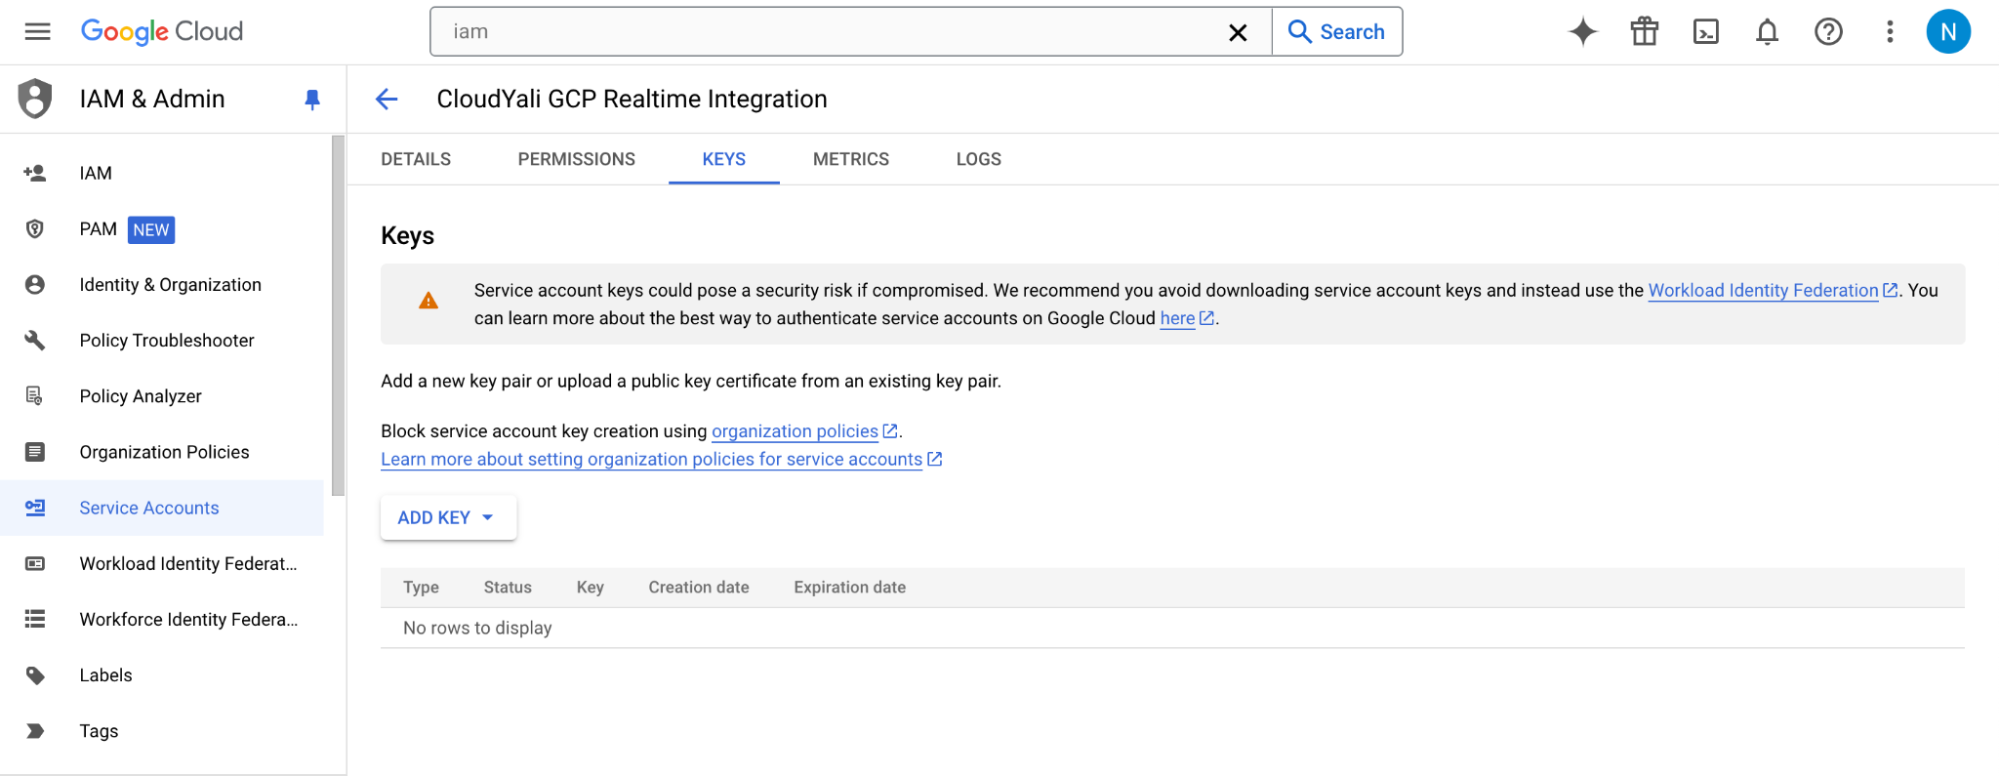
- Keep the default JSON option selected and click "Create."
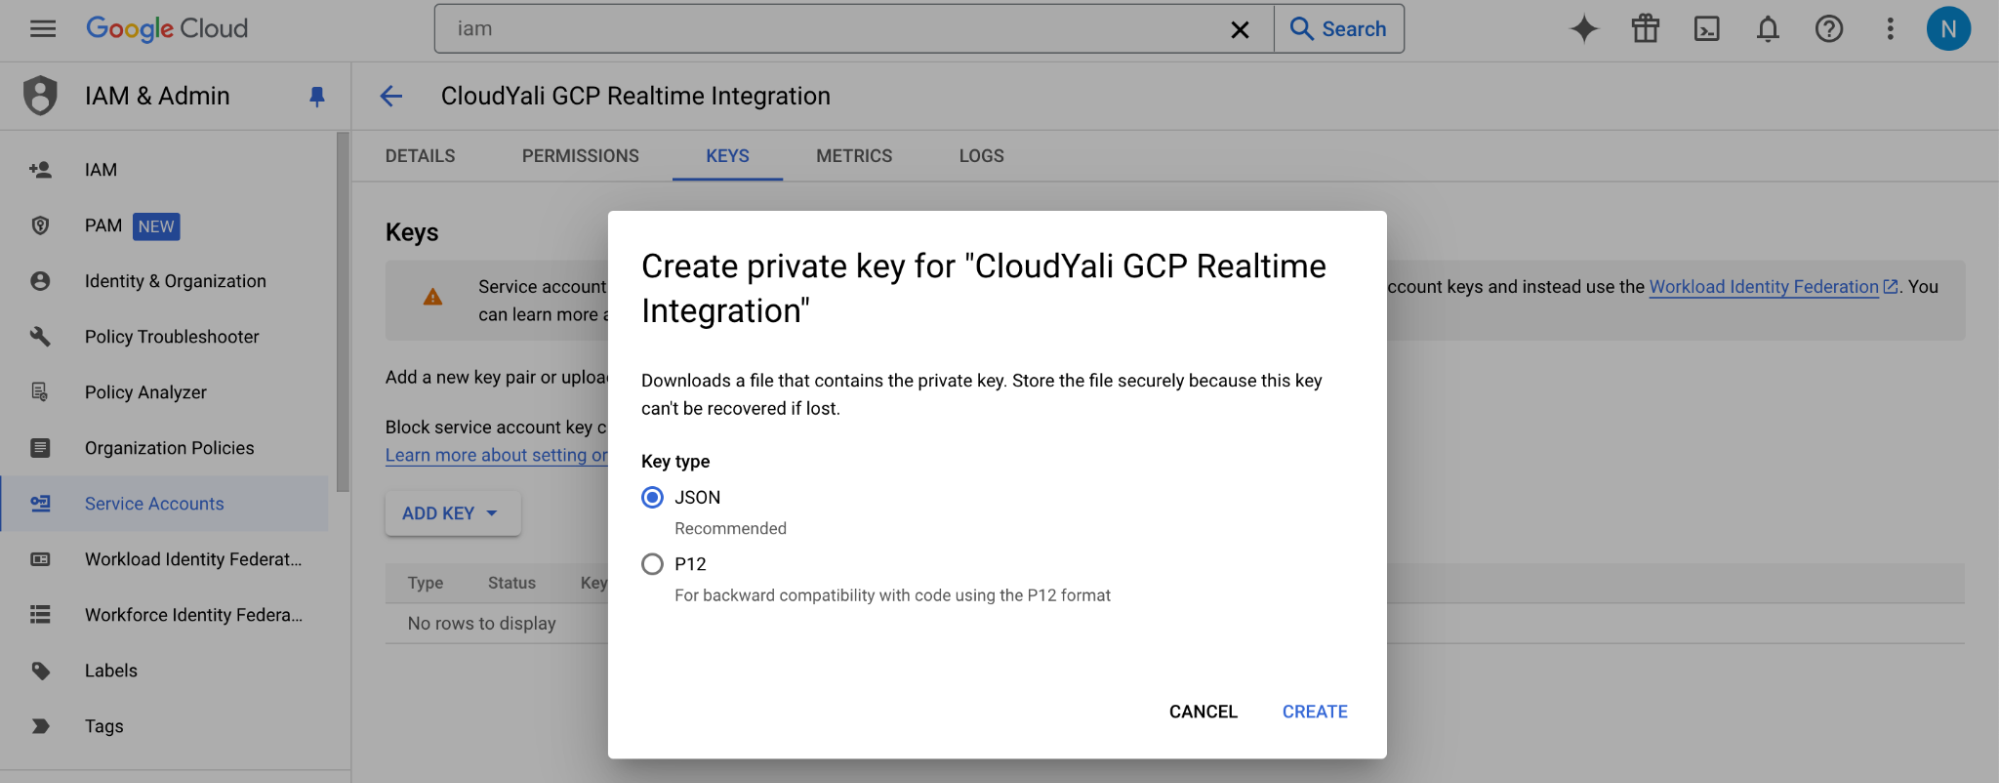
Save the JSON, this will be used as input for CloudYali integration.
If you see the error 'Service account key creation is disabled', your organization has the iam.disableServiceAccountKeyCreation policy enabled. See the Troubleshooting section below for how to resolve this.
Step 3: Create a BigQuery Dataset
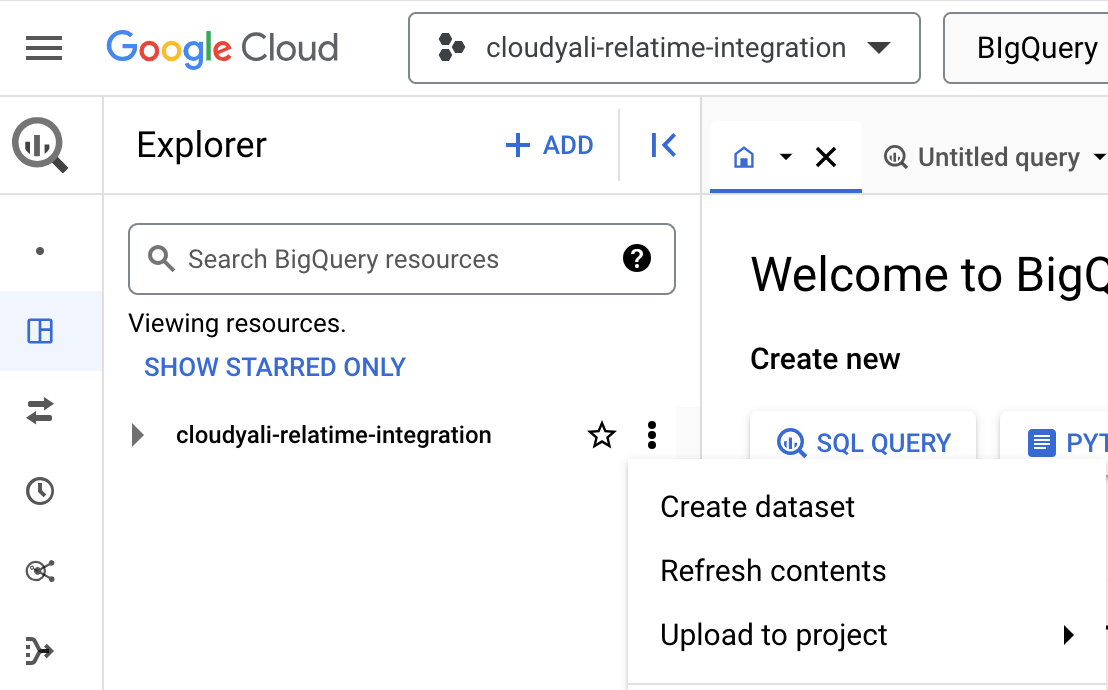
- Navigate to BigQuery in the GCP console.
- In the Explorer panel, click on the three vertical dots next to your project ID and select Create dataset.
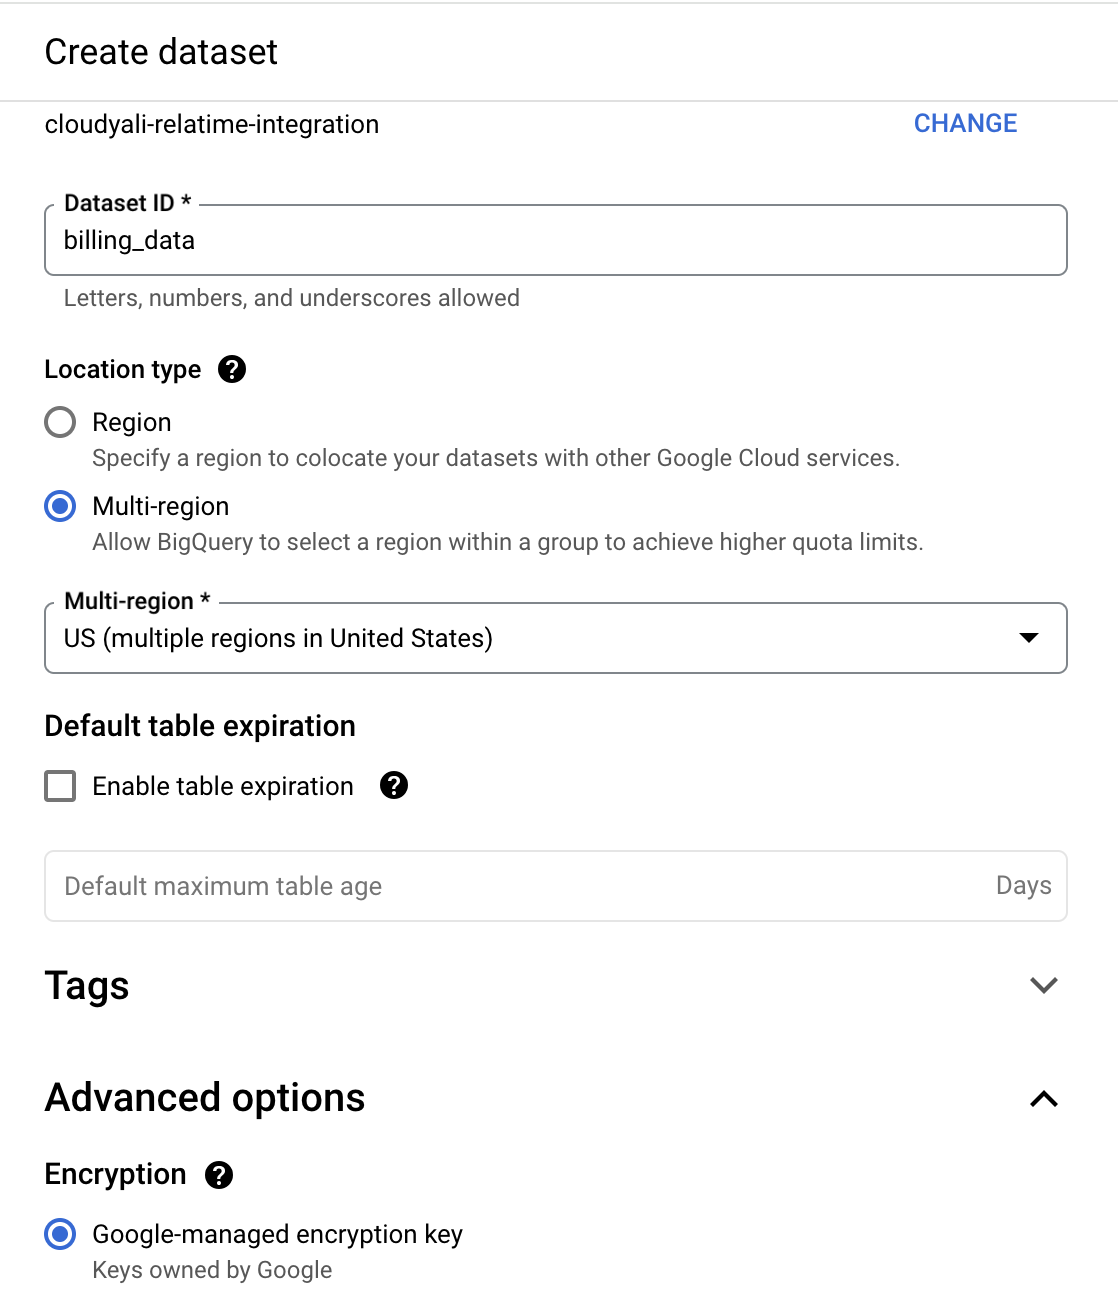
- Set the following values:
- Dataset ID: We recommend something descriptive like
billing_data. - Location type: Choose US(multiple regions in United States) or EU(multiple regions in European Union).
- Encryption: Set to Google-managed encryption key.
- Table expiration: Leave the Enable table expiration checkbox unchecked to ensure that data never expires.
- Dataset ID: We recommend something descriptive like
Step 4: Enable Cloud Billing Export
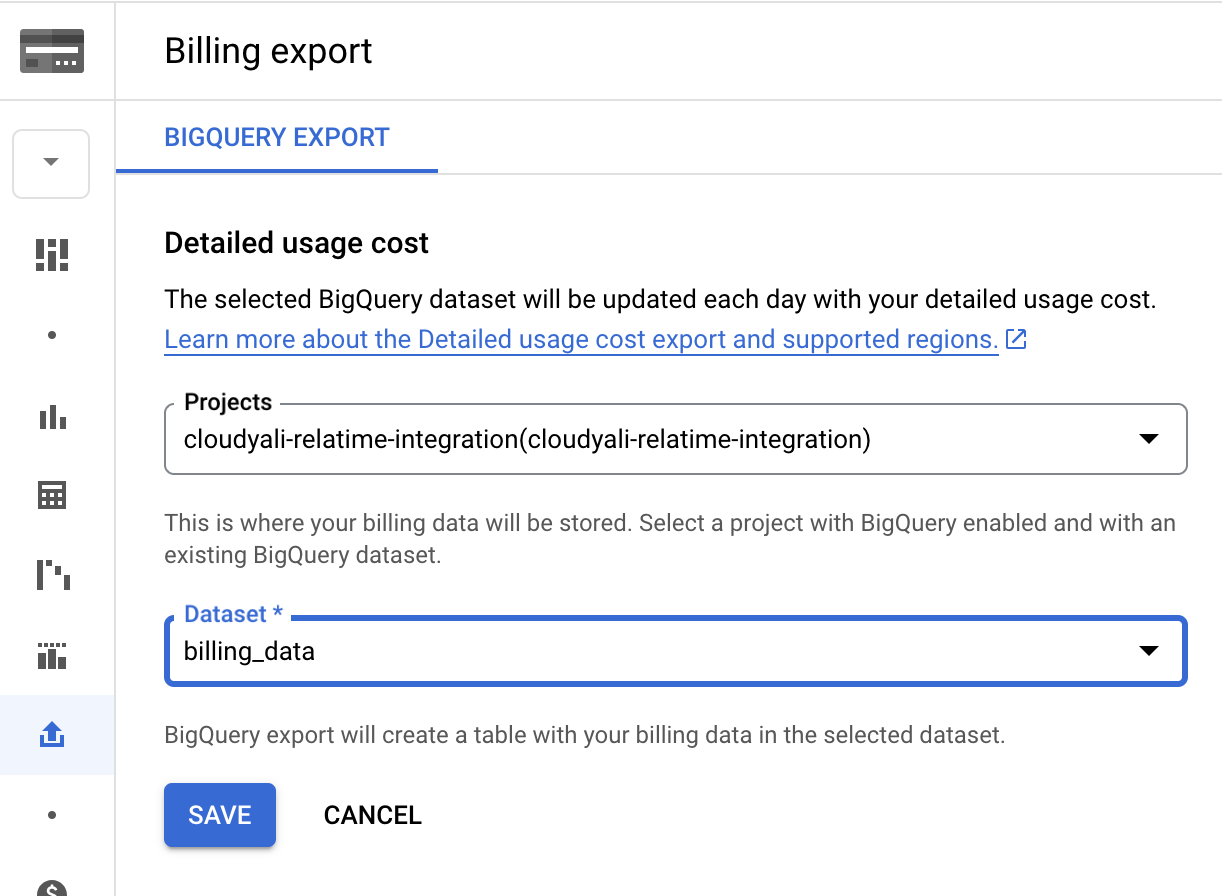
- In the GCP Console, while still in BigQuery, click the hamburger menu (three horizontal lines) at the top left of the console and select Billing.
- In the left Billing navigation menu, select Billing export. (You can also search for and navigate to Billing export from the main search bar at the top of the GCP console).
- Under Detailed usage cost, select the BigQuery dataset you just created and click EDIT SETTINGS.
- Configure the following settings:
- From the Projects list, select the project you set up (e.g. cloudyali-realtime-integration) to contain your billing data.
- For Dataset, select the dataset that you set up to contain your exported Cloud Billing data (e.g., billing_data).
- Click Save to enable the billing export.
Part 2: Granting Access to CloudYali
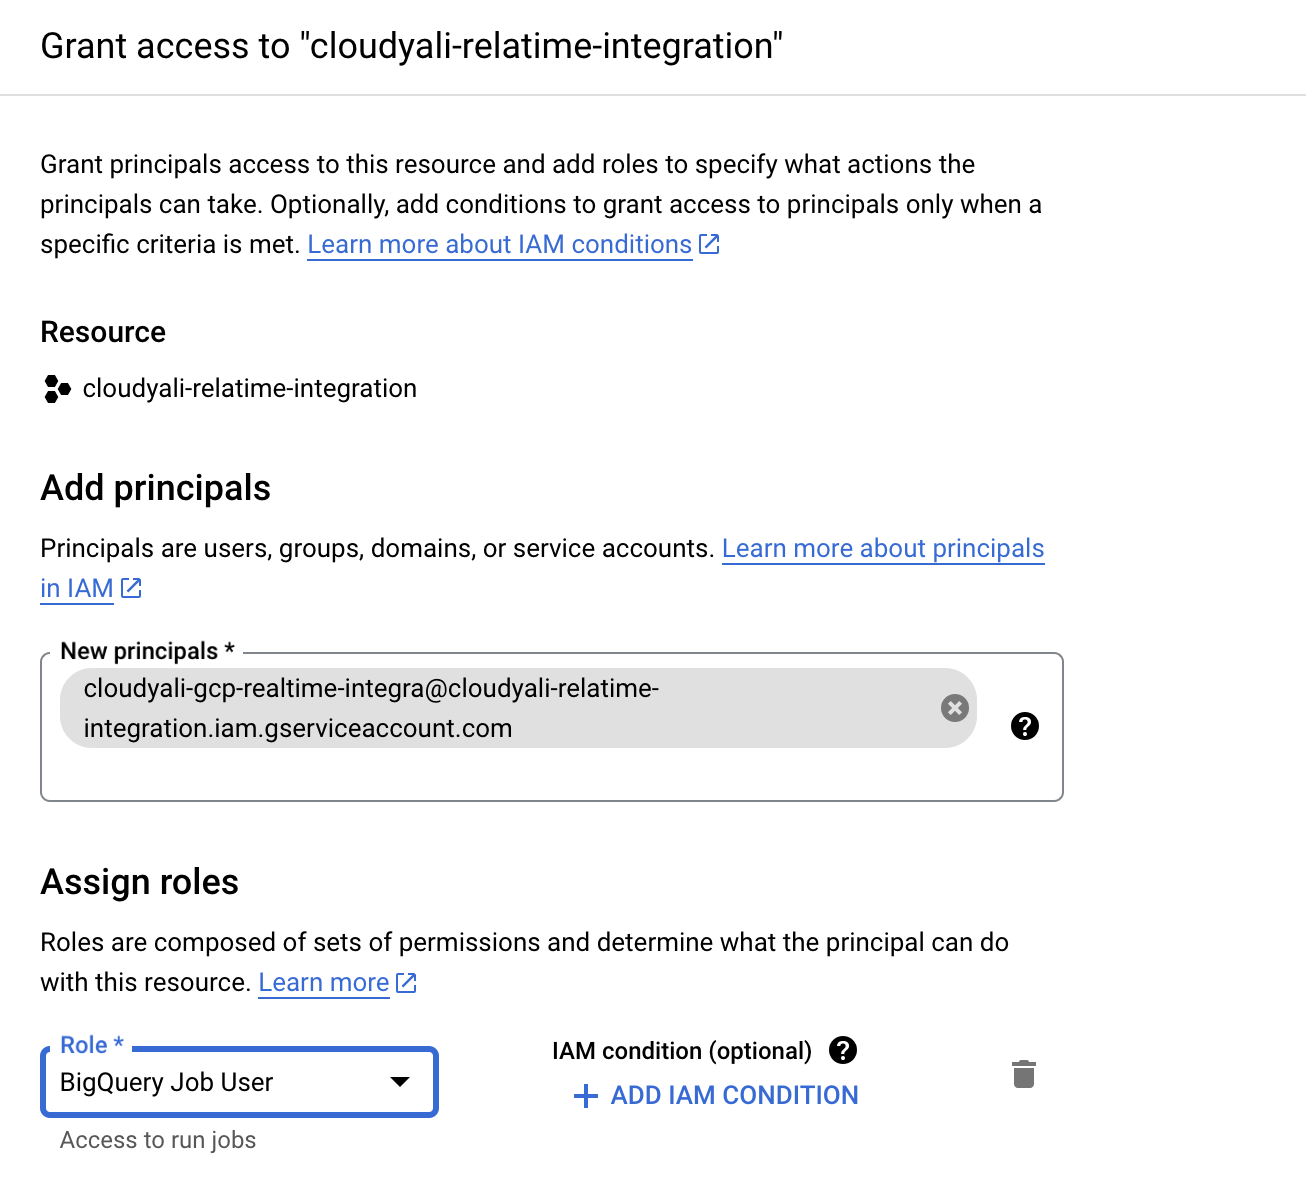
Step 1: Grant Service Account Permission to Access BigQuery
- Go to IAM & Admin in the GCP console.
- At the top of the IAM console, select the project that hosts the BigQuery dataset with your Cloud Billing export data (e.g.,
cloudyali-realtime-integration). - In the center of the page, under Permissions for the project you created earlier (e.g.,
cloudyali-realtime-integration), Click + GRANT ACCESS. - In the New Principals field, under Add Principals, select the service account you created earlier.
- In the Role field, under Assign roles, search for and select BigQuery Job User and SAVE.
Step 2: Grant the Service Account Permission to Access the BigQuery Dataset
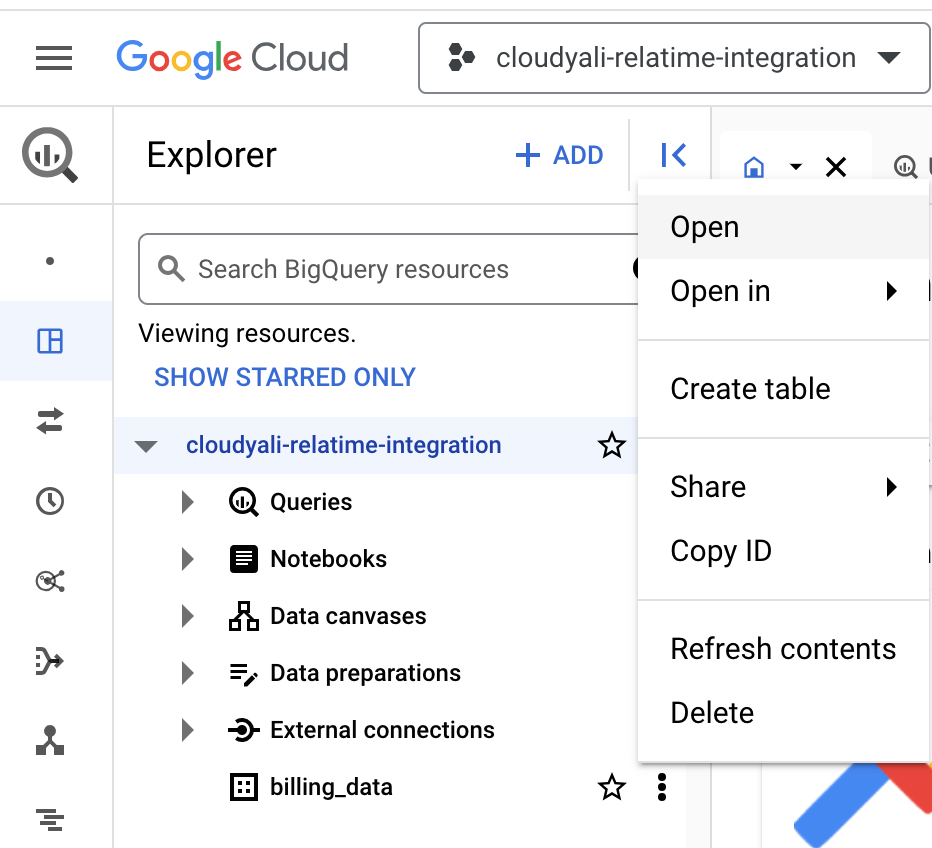
Go back to BigQuery, and complete the steps below to grant the service account permission to access the BigQuery dataset.
- At the top of the BigQuery console, ensure the project that you set up to contain your billing data is selected e.g.
cloudyali-realtime-integration. - In the Explorer panel, select your project (cloudyali-realtime-integration) to expand it.
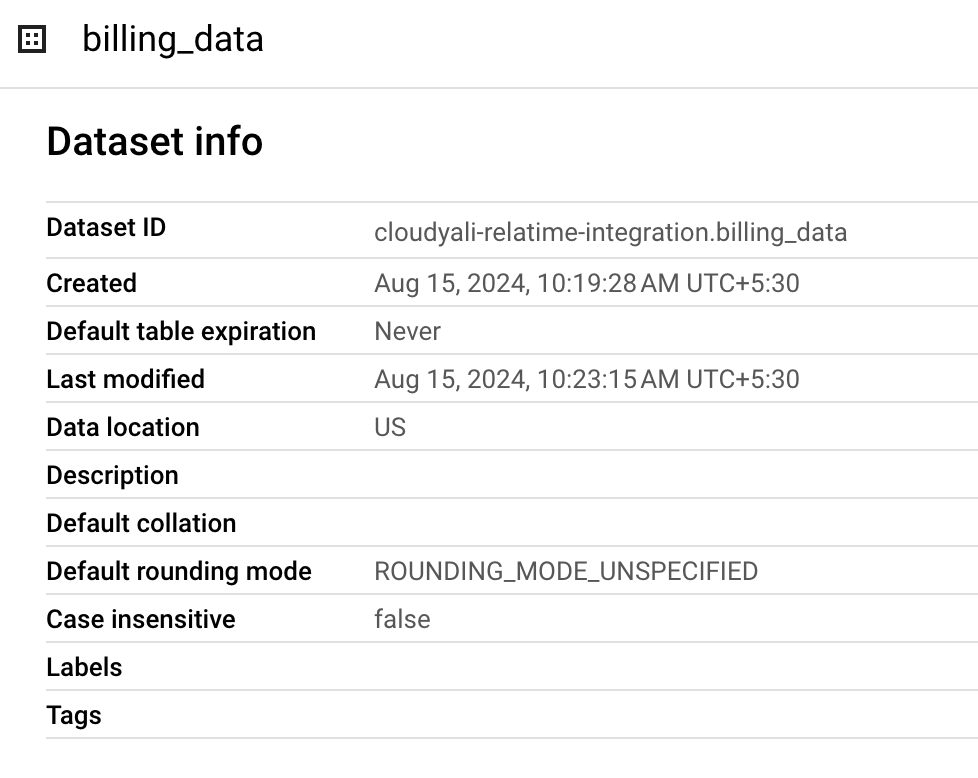
- Select the three vertical dots next to the dataset name (eg. billing_data), then click Open. The Dataset info will be displayed on the right. Keep this screen open to later obtain your project ID and dataset name.
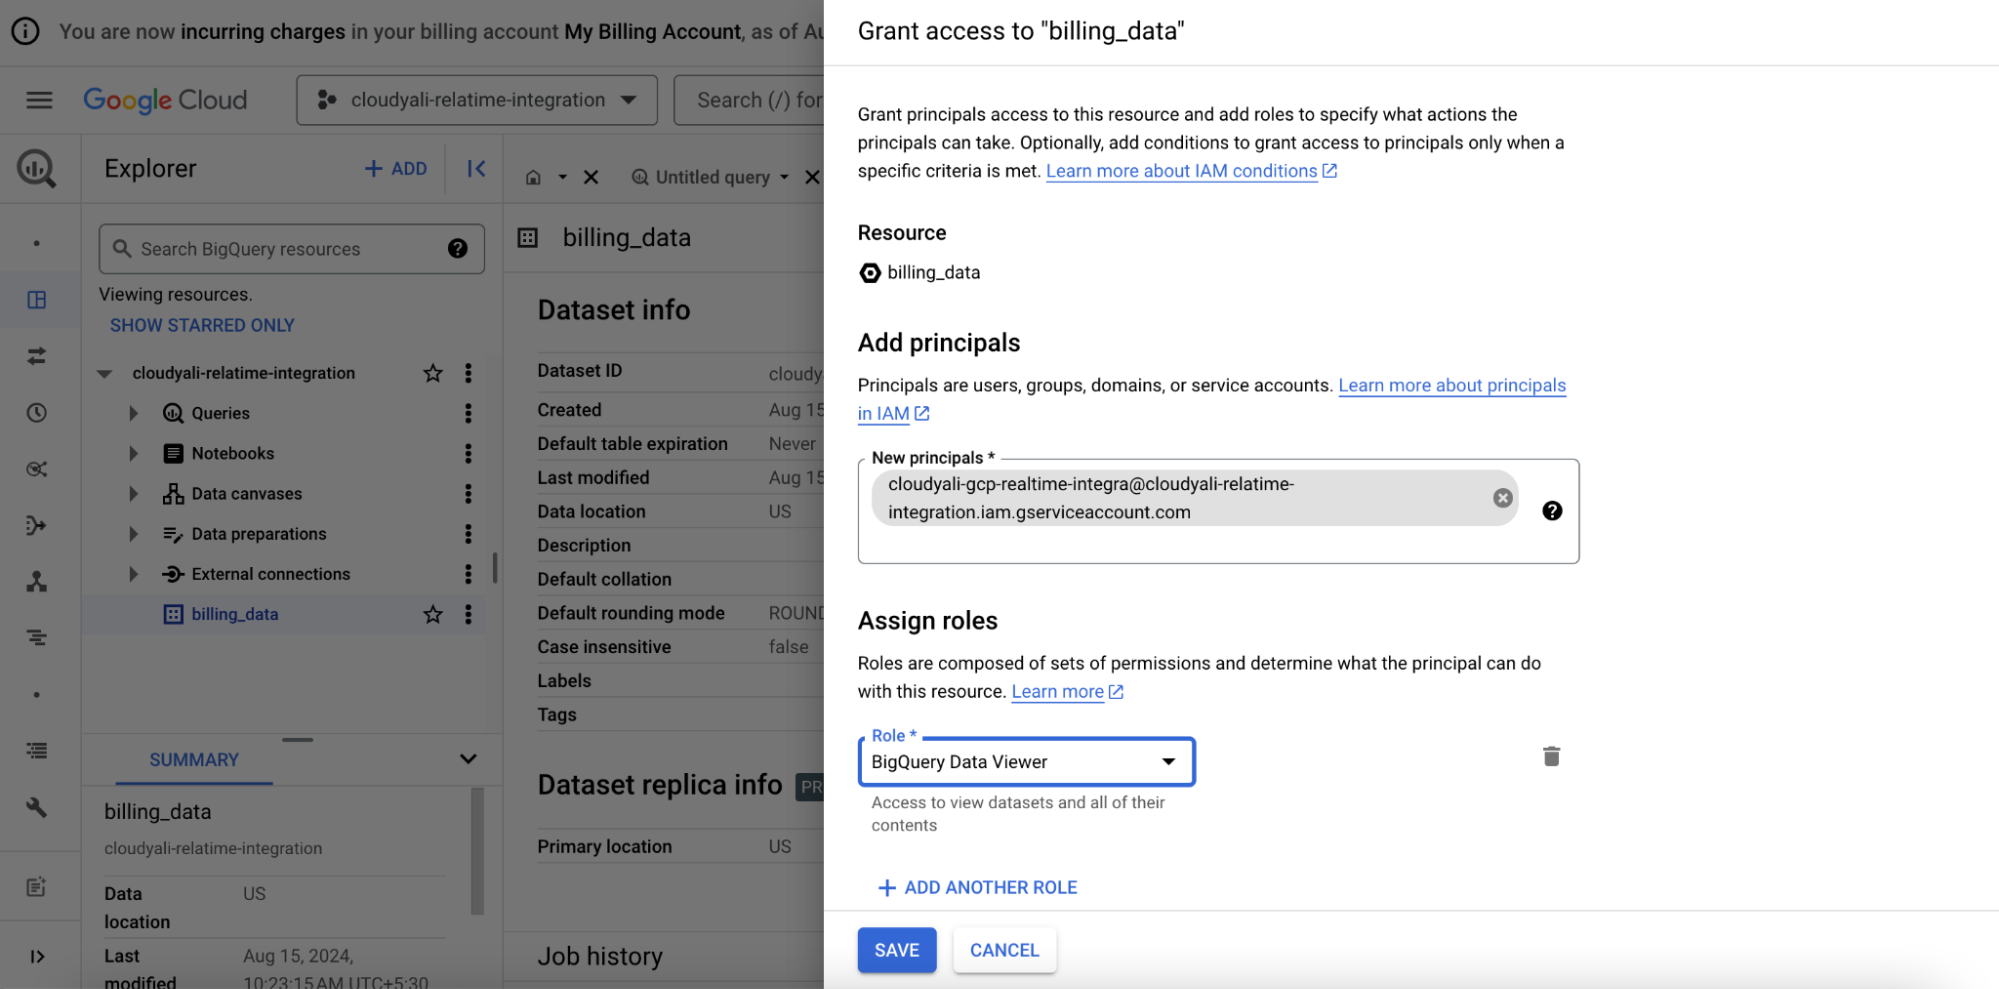
- Select the three vertical dots next to the dataset name again, then click Share.
- On the Share permissions panel that appears on the right, click + ADD PRINCIPAL.
- In the New principals field, under Add principals, search for and select the Service Account.
- In the Role field, under Assign roles, search for and select BigQuery Data Viewer and click SAVE.
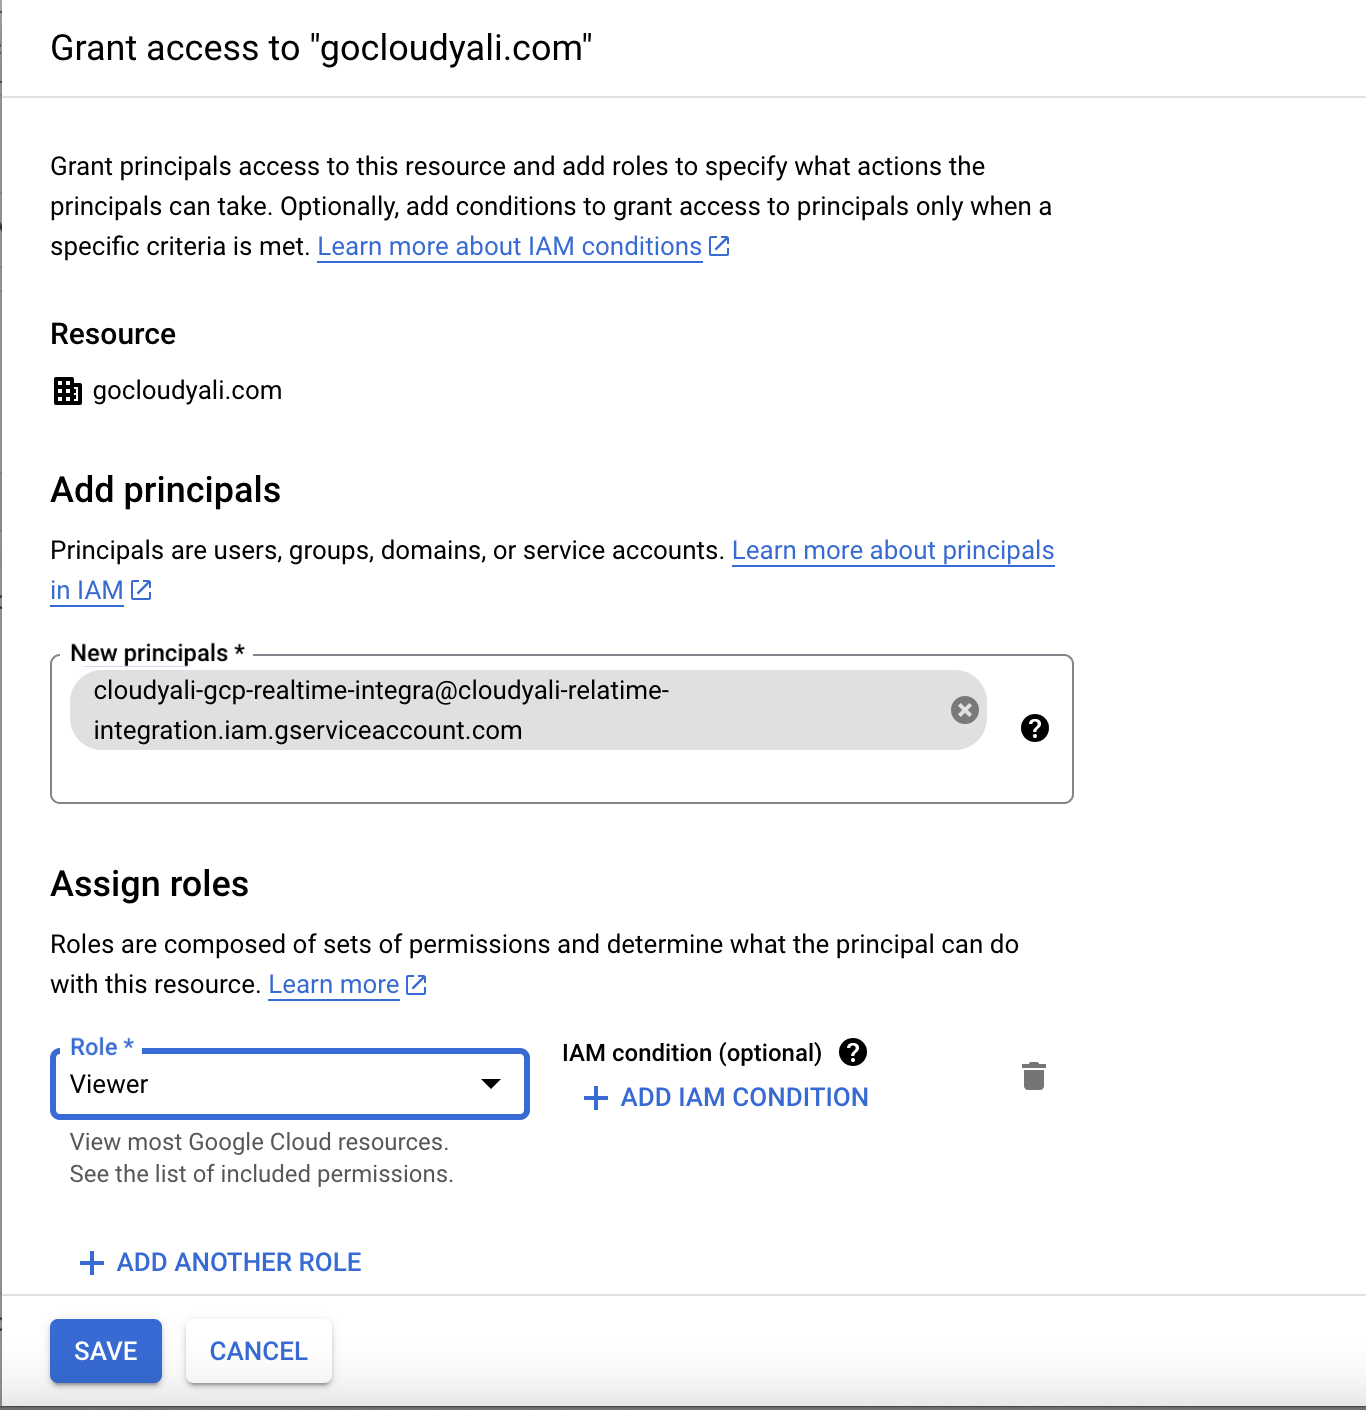
Step 3: Grant Viewer Role at Organization Level
- Navigate to IAM at the organizational level.
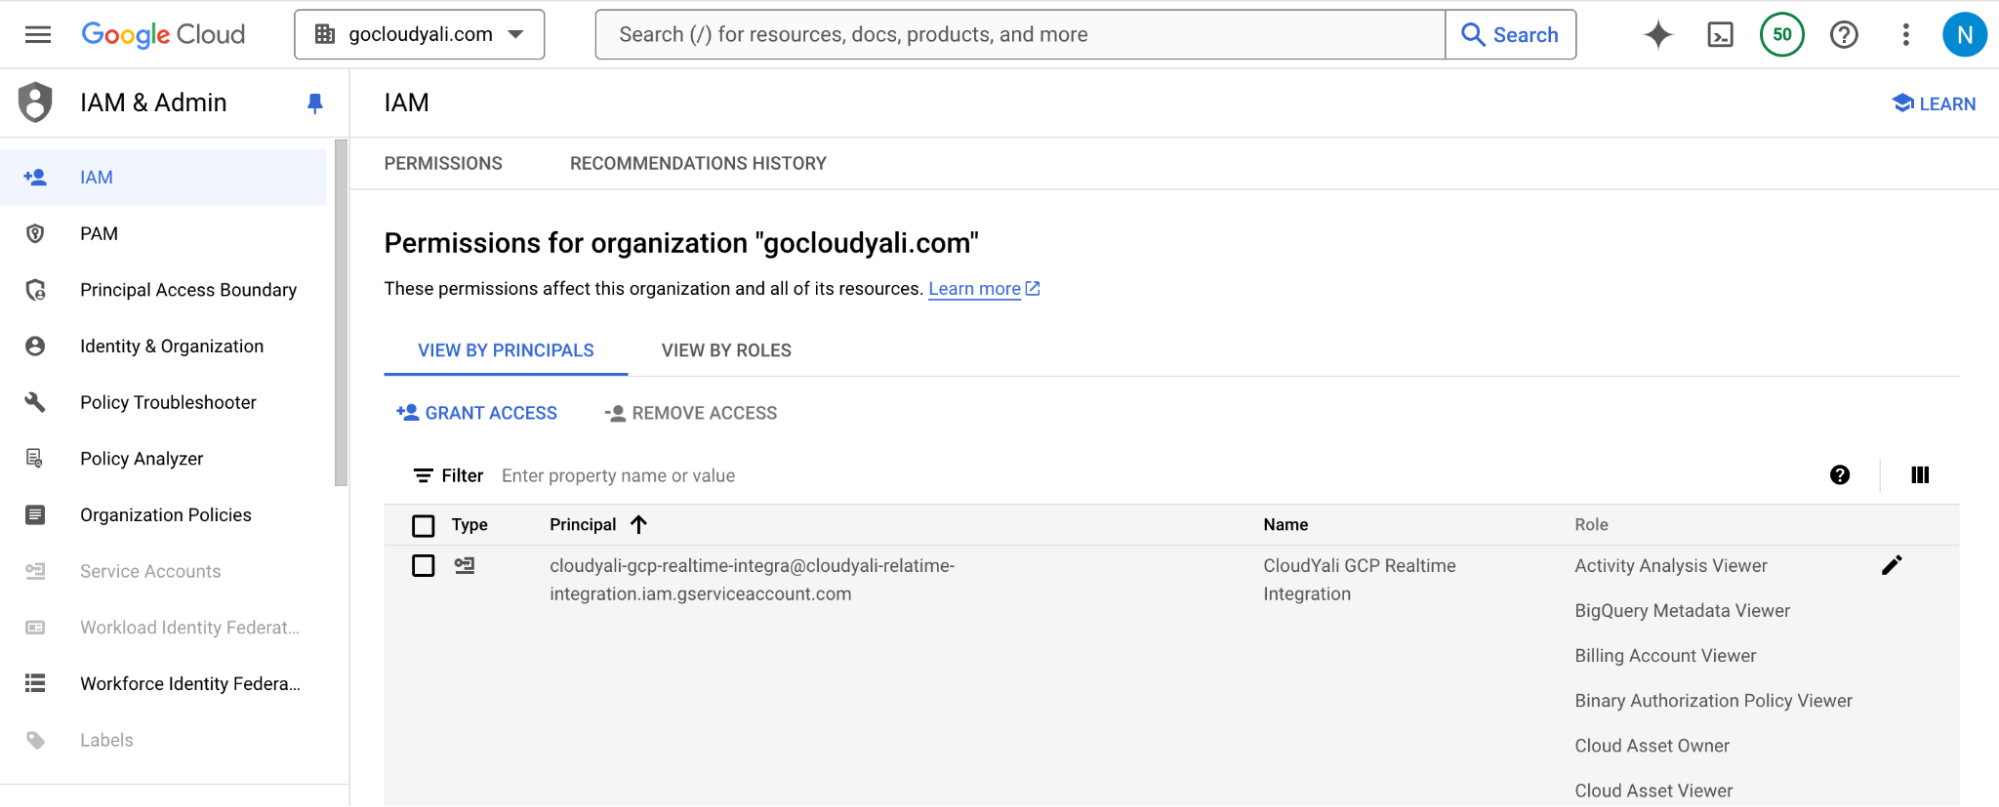
- In the center of the page, under Permissions for organizations, click + Grant Access.
- Under Add principals, add Service Account for the CloudYali integration project.
- Under Assign roles, click Basic and assign the Viewer role to allow read-only access to all projects.
Step 4: Provide Your GCP Configuration Information to CloudYali
Please keep the following information ready:
- Project ID - The project where the billing dataset is created (e.g.,
cloudyali-realtime-integration) - BigQuery Billing Export Table - The full path to your billing export table (e.g.,
billing_data.gcp_billing_export_resource_v1_0113FD_8F0982_FEC410) - Service Account JSON Key - The JSON key file you downloaded in Step 2
You can find your BigQuery billing export table path by:
- Go to BigQuery
- In the Explorer panel, expand your project
- Expand the dataset (e.g.,
billing_data) - Look for a table named like
gcp_billing_export_resource_v1_XXXXXX_XXXXXX_XXXXXX - The full path is:
dataset_name.table_name(e.g.,billing_data.gcp_billing_export_resource_v1_0113FD_8F0982_FEC410)
Complete the CloudYali Onboarding:
- Log in to CloudYali Console
- Click on your username in the upper right corner of the CloudYali console
- Select Settings from the dropdown menu
- Click on Connect GCP button
- In Step 1, enter:
- GCP Project ID - Your project ID (e.g.,
cloudyali-realtime-integration) - BigQuery Billing Export Table - The full path to your billing table (e.g.,
billing_data.gcp_billing_export_resource_v1_0113FD_8F0982_FEC410)
- GCP Project ID - Your project ID (e.g.,
- In Step 2, review the service account setup instructions
- In Step 3, upload your service account JSON key file
CloudYali validates your configuration during onboarding:
- BigQuery Access - Verifies the billing table exists and the service account has read access
- Inventory Access - Verifies Cloud Asset API is enabled and permissions are correct
- Organization Detection - Automatically detects your GCP organization for org-wide visibility
If validation fails, you'll receive a clear error message with instructions to fix the issue.
It usually takes a few hours for data to begin appearing. When detailed usage cost data is configured, Cloud Billing data is added retroactively for both the current and previous month. Please note that it can take up to five days for the full data for the current and previous month to be completely available.
Troubleshooting
Invalid Billing Table Path Format
If you see an error like "invalid billing table path" or "does not appear to be a GCP billing export table":
- Check the format - The billing table path must be in format:
dataset_name.table_name - Example:
billing_data.gcp_billing_export_resource_v1_0113FD_8F0982_FEC410 - Find the correct path - In BigQuery console, expand your project > expand the dataset > find the table starting with
gcp_billing_export_
BigQuery Dataset Not Found
If you see an error like "Dataset 'xyz' not found in project 'abc'":
- Verify the dataset name - Go to BigQuery and confirm the exact dataset name in your billing table path
- Check the project - Ensure you're entering the correct Project ID where the dataset was created
- Wait for propagation - If you just created the dataset, wait a few minutes for it to become available
BigQuery Table Not Found
If you see an error like "Table 'xyz' not found in dataset":
- Verify the table exists - In BigQuery console, expand your dataset and look for tables starting with
gcp_billing_export_ - Check billing export setup - Ensure Cloud Billing export is configured and data has been exported (may take a few hours after initial setup)
- Copy the exact table name - The table name includes underscores and a billing account identifier
BigQuery Permission Denied
If you see an error like "Service account does not have permission to access dataset":
- Verify BigQuery Data Viewer role - Ensure the service account has the
BigQuery Data Viewerrole on the dataset (see Step 2: Grant the Service Account Permission to Access the BigQuery Dataset) - Verify BigQuery Job User role - Ensure the service account has the
BigQuery Job Userrole on the project (see Step 1: Grant Service Account Permission to Access BigQuery) - Wait for propagation - IAM permission changes can take up to 15 minutes to propagate
API Permission Changes Not Reflecting
After enabling the Cloud Asset API, it may take 15-20 minutes for permission changes to fully propagate. If you're still seeing permission errors after enabling the API, try force-refreshing by disabling and re-enabling the API:
# Disable and re-enable to force refresh
gcloud services disable cloudasset.googleapis.com --project=YOUR_PROJECT_ID --force
gcloud services enable cloudasset.googleapis.com --project=YOUR_PROJECT_ID

# Verify it's enabled
gcloud services list --enabled --project=YOUR_PROJECT_ID | grep cloudasset
Replace YOUR_PROJECT_ID with your actual project ID (e.g., cloudyali-realtime-integration). The API must be enabled in the project where your service account is created/used, not in individual projects you want to scan.
Service Account Key Creation is Disabled
If you see this error when trying to create a service account key:
An Organization Policy that blocks service accounts key creation has been enforced on your organization.
Enforced Organization Policies IDs:
iam.disableServiceAccountKeyCreation
Cause: Your Organization Policy Administrator has enabled the iam.disableServiceAccountKeyCreation constraint to prevent security incidents related to service account keys. This is part of Google's "Secure by Default" enforcements.
Solutions:
Option 1: Request Policy Exception (Recommended for most organizations)
Contact your Organization Policy Administrator to create an exception for the CloudYali service account:
- Go to IAM & Admin > Organization Policies
- Search for Disable service account key creation (
iam.disableServiceAccountKeyCreation) - Click on the policy and select Manage Policy
- Add a conditional exception for specific projects or service accounts
- Save the policy
Option 2: Temporarily Disable the Policy
If you have the roles/orgpolicy.policyAdmin role:
# Disable the constraint temporarily
gcloud org-policies reset constraints/iam.disableServiceAccountKeyCreation \
  --project=YOUR_PROJECT_ID

# After creating the key, re-enable the constraint
gcloud org-policies set-policy policy.yaml --project=YOUR_PROJECT_ID
Option 3: Use Workload Identity Federation (Advanced)
For organizations with strict security requirements, consider using Workload Identity Federation instead of service account keys. Contact CloudYali support for assistance with this setup.
Summary
After following the above steps, your GCP account will be onboarded for CloudYali Cost Management. It may take a few hours for billing data to appear, and data from the current and previous month may take up to five days to fully propagate.