MCP Integration Setup
To connect an AI assistant to CloudYali, add the CloudYali MCP server URL to the client, sign in to CloudYali, and approve access.
Prerequisites
- A CloudYali account.
- An MCP client that supports remote MCP servers. Some plans restrict custom connectors; see the notes for each client.
- Server URL:
https://mcp.cloudyali.io/mcp
Anthropic Claude (claude.ai, Claude Desktop, mobile)
- Go to Settings → Connectors.
- Select Add custom connector.
- Enter the name
CloudYaliand the URLhttps://mcp.cloudyali.io/mcp. Select Add. - Select Connect on the connector. Complete sign-in and approval.
- In a chat, open the tools menu and enable CloudYali.
Connectors added on claude.ai are also available in Claude Desktop and the Claude mobile apps.
An organization owner adds the connector under Admin settings → Connectors. Each member then selects Connect and signs in with their own CloudYali account.
Claude Code
-
Add the server:
claude mcp add --transport http cloudyali https://mcp.cloudyali.io/mcp -
Run
/mcp, select cloudyali, then select Authenticate. -
Complete sign-in and approval in the browser.
-
Run
/mcpagain. The server status isconnected.
OpenAI ChatGPT
Custom MCP connectors in ChatGPT require developer mode.
- Go to Settings → Apps & Connectors → Advanced settings and enable Developer mode.
- In Apps & Connectors, select Create.
- Enter:
- Name:
CloudYali - MCP server URL:
https://mcp.cloudyali.io/mcp - Authentication: OAuth
- Name:
- Confirm that you trust the application and select Create.
- Complete sign-in and approval.
- In a new chat, open the + menu, select Developer mode, and enable CloudYali.
A workspace admin may need to enable developer mode or custom connectors before members can add CloudYali.
OpenAI Codex CLI
-
Add the server to
~/.codex/config.toml(%USERPROFILE%\.codex\config.tomlon Windows):[mcp_servers.cloudyali]url = "https://mcp.cloudyali.io/mcp" -
Sign in:
codex mcp login cloudyali -
Complete sign-in and approval in the browser.
Cursor
-
Add the server in Cursor Settings → MCP → Add new MCP server, or edit
~/.cursor/mcp.json(global) or.cursor/mcp.json(project):{"mcpServers": {"cloudyali": {"url": "https://mcp.cloudyali.io/mcp"}}} -
In Cursor Settings → MCP, select Connect (or Needs login) next to
cloudyali. -
Complete sign-in and approval in the browser.
VS Code (GitHub Copilot)
-
Add the server to
.vscode/mcp.json. The top-level key isservers, notmcpServers:{"servers": {"cloudyali": {"type": "http","url": "https://mcp.cloudyali.io/mcp"}}} -
Select Start above the server entry.
-
Complete sign-in and approval in the browser.
-
Use Copilot Chat in Agent mode.
Windsurf
-
Add the server to
~/.codeium/windsurf/mcp_config.json:{"mcpServers": {"cloudyali": {"serverUrl": "https://mcp.cloudyali.io/mcp"}}} -
Refresh the MCP server list in Cascade.
-
Complete sign-in and approval in the browser.
Gemini CLI
-
Add the server to
~/.gemini/settings.json:{"mcpServers": {"cloudyali": {"httpUrl": "https://mcp.cloudyali.io/mcp"}}} -
Run
/mcp auth cloudyali. -
Complete sign-in and approval in the browser.
Other MCP clients
For clients that support remote (Streamable HTTP) MCP servers with OAuth, configure the URL https://mcp.cloudyali.io/mcp and follow the client's sign-in prompt.
For clients that support only local stdio servers, use the mcp-remote bridge. Requires Node.js.
{
  "mcpServers": {
    "cloudyali": {
      "command": "npx",
      "args": ["-y", "mcp-remote", "https://mcp.cloudyali.io/mcp"]
    }
  }
}
Sign-in and approval
All clients use the same browser flow.
- The client opens a CloudYali page in the browser.
- Sign in with your CloudYali credentials. MFA and SSO are supported. If you are already signed in to the CloudYali console, this step is skipped.
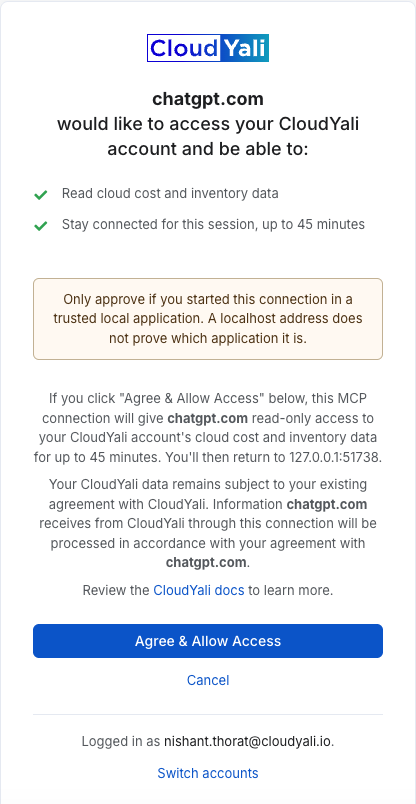
- The approval screen shows:
- The requesting client (for example,
chatgpt.comorclaude.ai). - The requested permissions: Read cloud cost and inventory data and Stay connected for this session, up to 45 minutes.
- The address the browser returns to after approval.
- The signed-in CloudYali user.
- The requesting client (for example,
- Select Agree & Allow Access to approve, or Cancel to deny. After approval, the browser returns to the client.
To approve as a different CloudYali user, select Switch accounts before approving.
If the client receives the result on a local address such as 127.0.0.1, the approval screen displays: "Only approve if you started this connection in a trusted local application. A localhost address does not prove which application it is." Desktop and terminal clients commonly use local addresses. Approve only if you started the connection from a trusted application.
Verify the connection
Send a test prompt:
"Using CloudYali, what did we spend last month?"
A successful response contains a cost figure and the date range used.
Reconnect after expiry
Each connection is valid for up to 45 minutes and is not renewed automatically. After expiry, the client returns an authentication error or prompts you to reconnect.
To reconnect, select Connect in the client (terminal clients: run the client's authenticate command, for example /mcp → Authenticate in Claude Code) and approve again. If your CloudYali console session is active, no password is required.
Troubleshooting
| Symptom | Cause | Resolution |
|---|---|---|
| "This request has expired. Start again from your MCP client." | The approval page expired, or was reopened with the browser Back button. | Start the connection again from the client. |
| "Couldn't reach CloudYali MCP. Retry, or start again from your MCP client." | The approval page could not load the request from the MCP server. | Select Retry. If the error persists, start again from the client. |
| "MCP connections can't be made while impersonating a customer." | The session is a CloudYali staff impersonation session. | End impersonation and sign in as yourself. |
| Authentication error during a conversation | The 45-minute connection expired. | Reconnect. |
| The assistant does not use CloudYali | The connector is not enabled for the chat, or the client is not in agent/tool mode. | Enable CloudYali in the chat tools menu (ChatGPT: + → Developer mode; VS Code: Agent mode), or start the prompt with "Using CloudYali, …". |
| Create or Add custom connector is not available | The plan or workspace does not allow custom connectors. | Contact your workspace admin, or use another supported client. |
| Figures differ from the console | The assistant used a different grouping, date range or cost type. | Ask the assistant which filters it applied and compare with the console. |
Disconnect
Remove the CloudYali connector or server entry from the client. Any active connection expires within 45 minutes.