Azure Account Onboarding Overview
Welcome to the CloudYali Azure Account Onboarding Guide! This document serves as an overview of onboarding for Microsoft Azure accounts.
CloudYali uses Service Principals to securely access and manage data from your Azure subscriptions, allowing read-only access for cost management and anomaly detection. This guide will link you to the detailed instructions for each account type.
Microsoft renamed "Azure Active Directory" to "Microsoft Entra ID" in 2023. If you see references to "Azure AD" in the Azure portal or in CLI commands, they refer to the same service.
Supported Azure Account Types
CloudYali supports all major Azure account types:
| Account Type | Best For | Setup Complexity |
|---|---|---|
| Pay-as-You-Go (PAYG) | Startups, small teams | Simple |
| Microsoft Customer Agreement (MCA) | Growing businesses | Medium |
| Enterprise Agreement (EA) | Large enterprises | Medium |
Overview of Onboarding Options
1. Azure Cost Management Setup
This onboarding method helps you set up Cost Management Exports by connecting your cost data with CloudYali. This allows you to track and manage cloud costs using daily cost exports to Azure Storage.
-
Who Should Use This? Use this option if you need detailed cost tracking and analysis for your Azure resources.
-
Features:
- Set up a Service Principal with minimal permissions.
- Configure Cost Management Exports to Azure Storage Account.
- Monitor cloud spend for your Azure subscriptions.
- Receive automatic cost anomaly detection.
- Track usage by resource, location, and tags.
For detailed instructions, please refer to the Azure Cost Management Setup Guide.
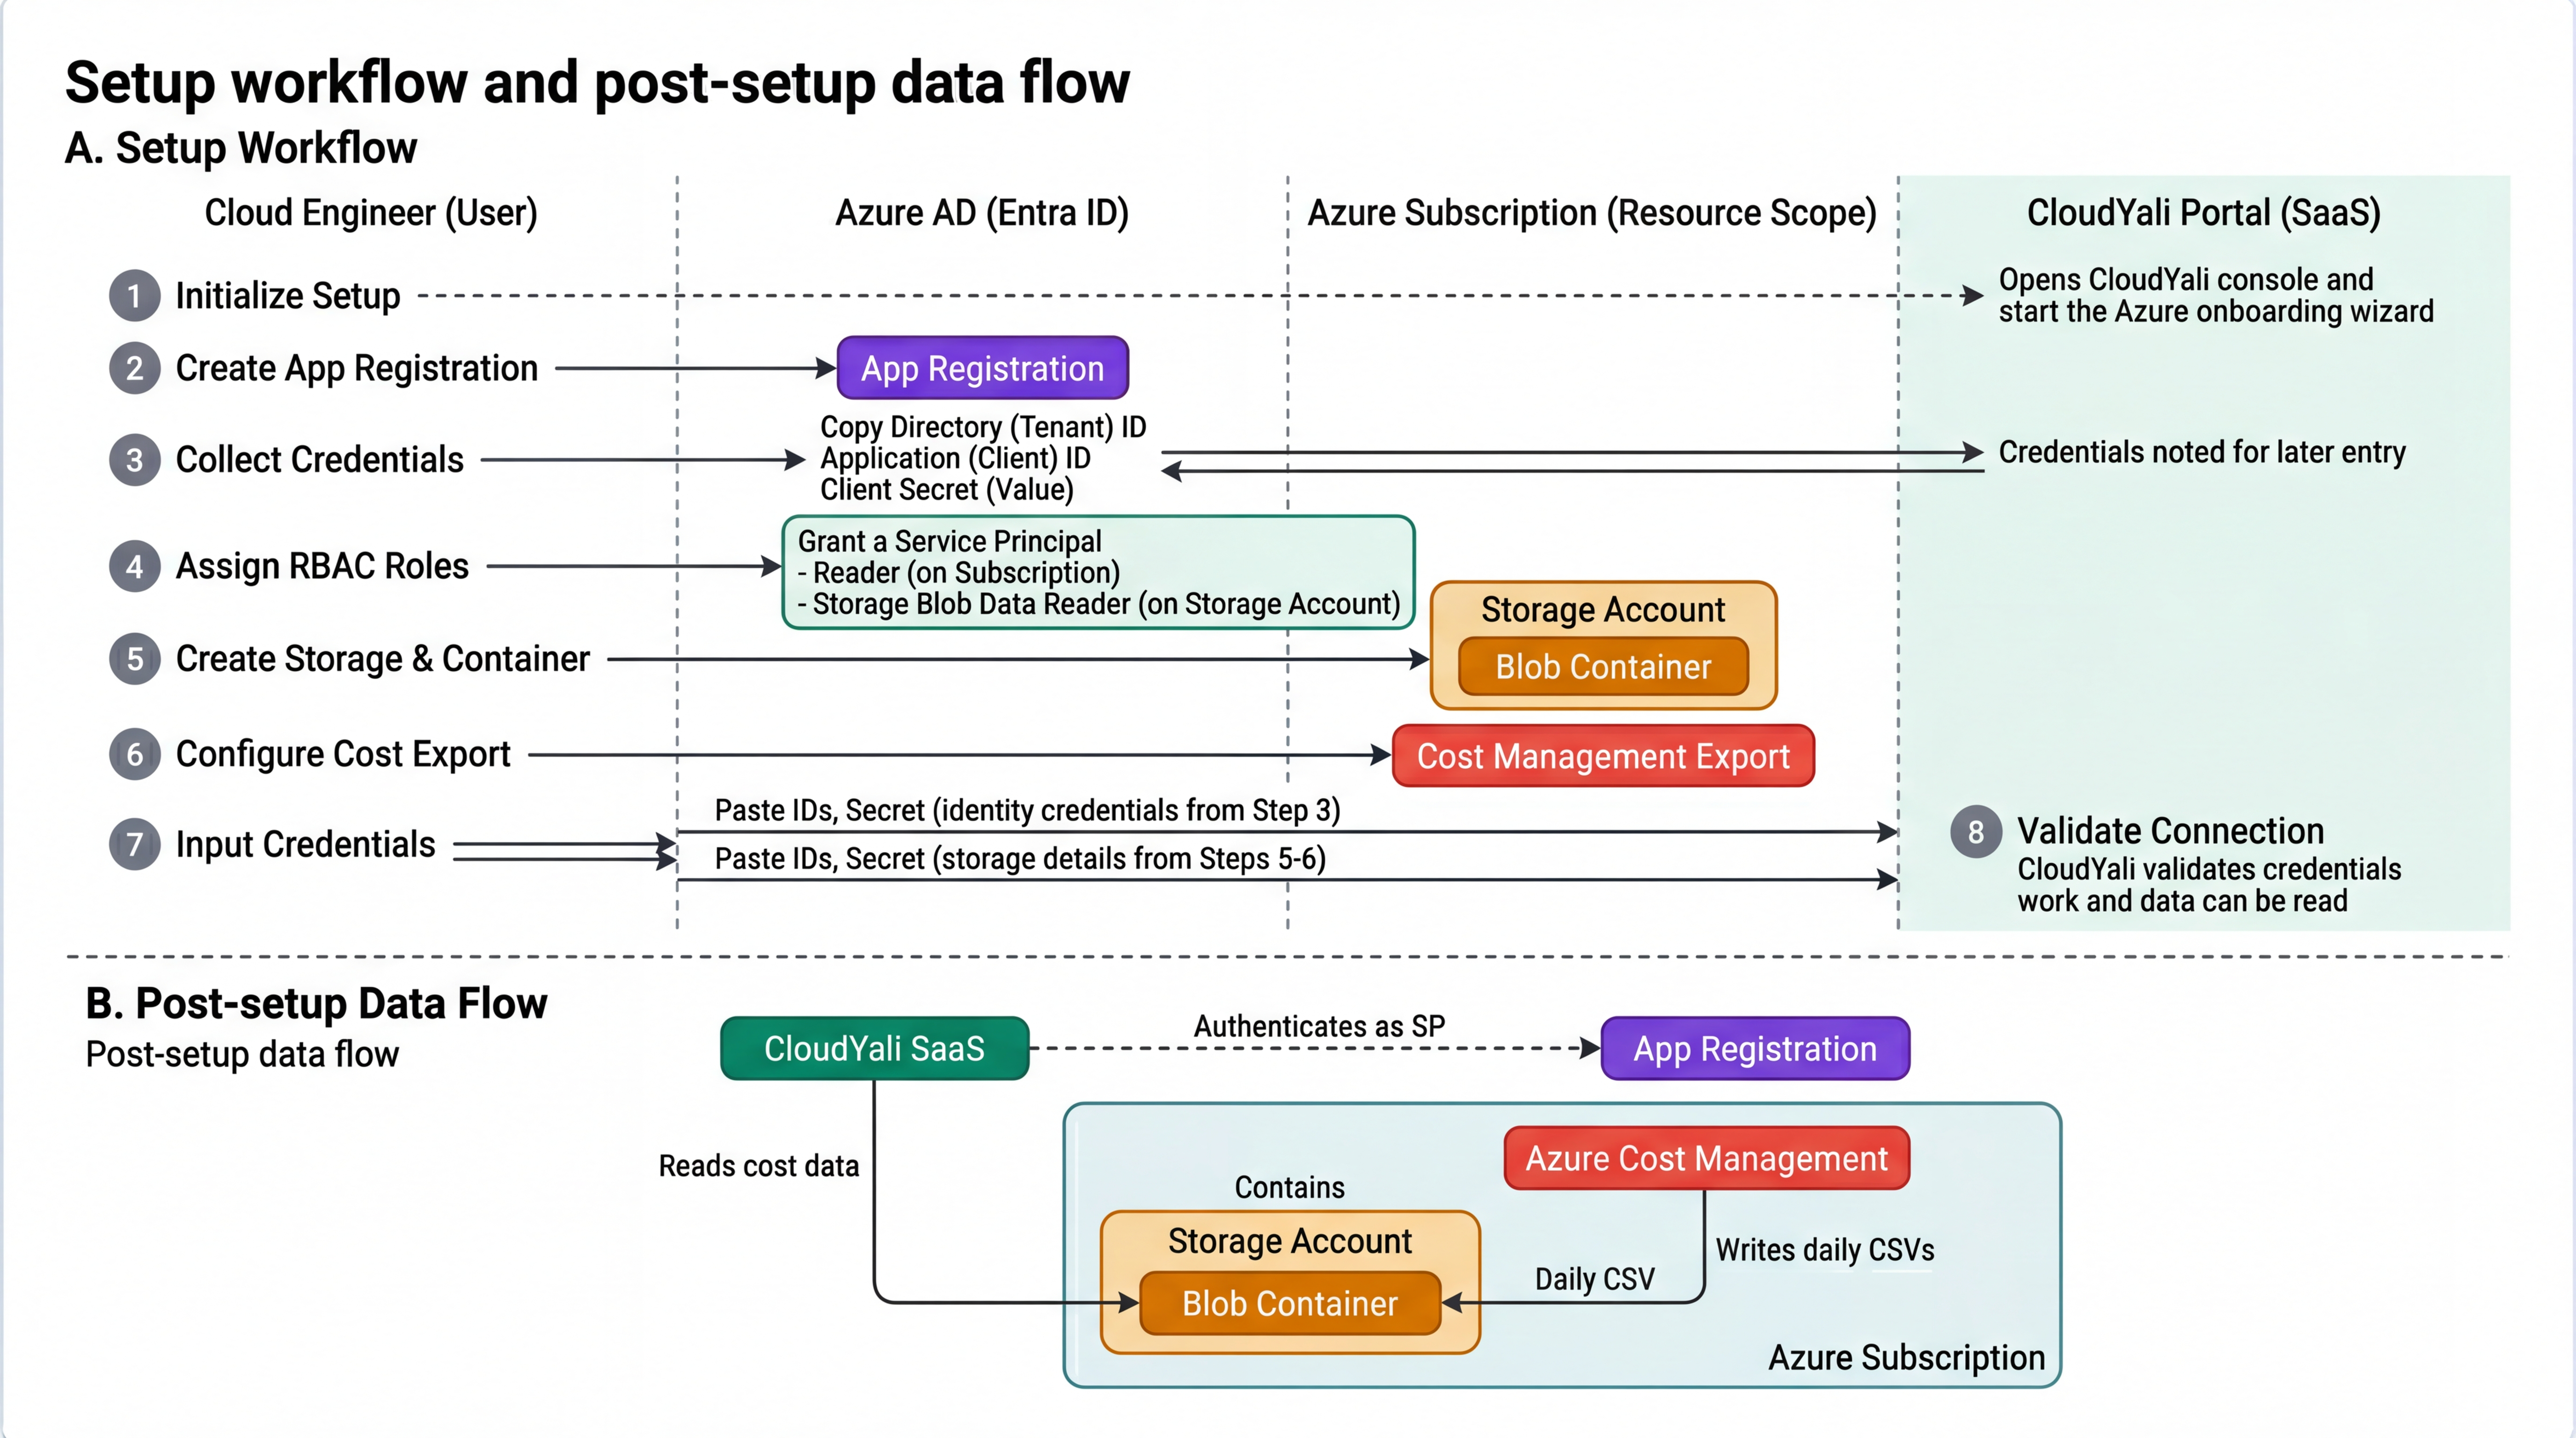
How CloudYali Connects to Azure
CloudYali uses Azure Cost Management Exports to ingest your cost data. Here's why this approach matters:
Instead of polling the Azure Cost Management API directly (which is subject to rate limits and can miss data during API outages), CloudYali reads cost data from daily CSV exports that Azure generates and stores in your own Azure Storage Account.
This architecture gives you three advantages:
-
Your data stays in your tenant — Cost exports live in your Azure Storage Account. CloudYali reads them with read-only access. You control retention, encryption, and access policies.
-
Reliable and complete data — Azure generates exports on a fixed schedule regardless of API availability. No data gaps from throttling or transient API errors.
-
Full cost visibility — Exports include the complete cost dataset: actual costs, amortized costs, usage details, tags, and resource metadata.
What this means for setup: You'll need to create a Storage Account and configure a Cost Management Export (Steps 3-4 below) in addition to the Service Principal. This takes an extra 5-10 minutes but ensures reliable, enterprise-grade data ingestion.
Setup workflow and post-setup data flow
How Azure entities relate
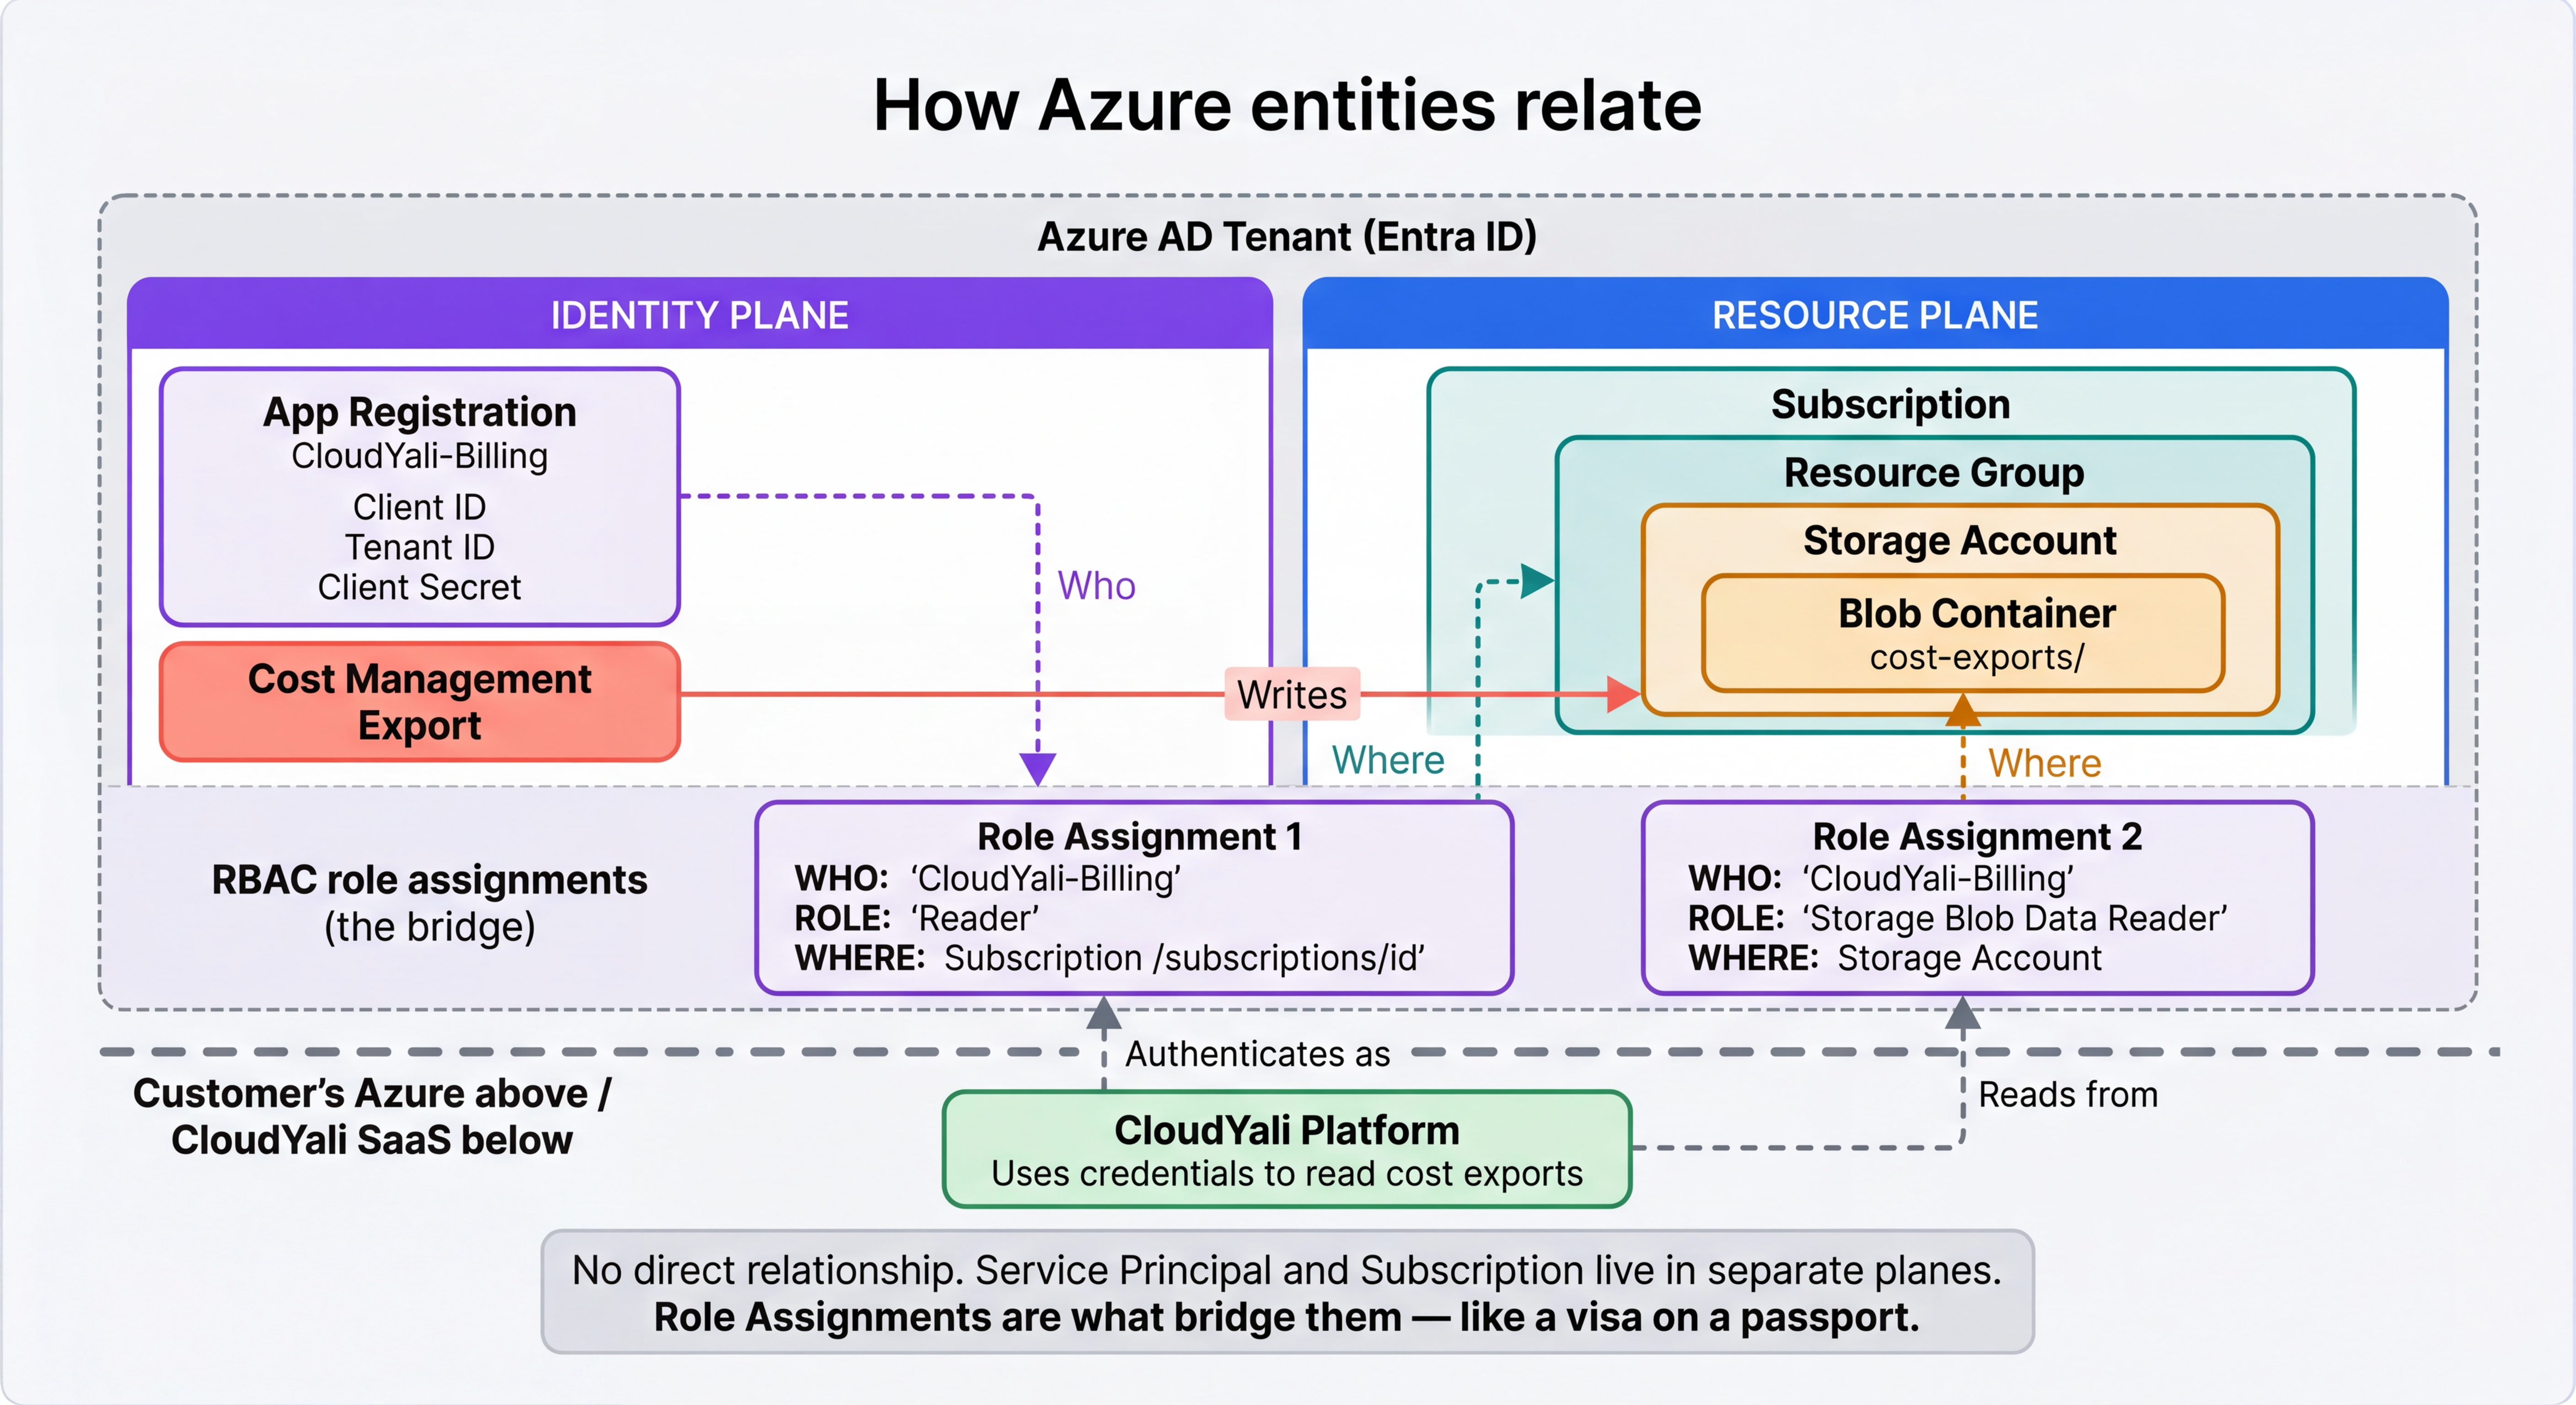
Security Considerations
Key Security Benefits:
- Service Principal Security: CloudYali uses a dedicated Service Principal for Azure integration, ensuring that CloudYali has access only to the necessary data for cost management.
- Minimal Permissions: CloudYali uses only Reader (PAYG/EA) or Billing Account Reader (MCA) roles - never requesting WRITE permissions.
- Encrypted Credentials: Service Principal credentials are encrypted with AES-256 and stored in AWS Secrets Manager, never in the application database.
- Read-Only Access: CloudYali can only read cost and usage data; it cannot create, modify, or delete any Azure resources.
- Storage Security: Cost exports are stored in Azure Blob Storage with private access; CloudYali uses Storage Blob Data Reader role for read-only access.
General Onboarding Steps
Step 1: Log in to CloudYali Console
- Navigate to your CloudYali portal (e.g., https://portal.cloudyali.com)
- Click Settings in the main menu
- Click Integrations
- Click + Connect Azure
Step 2: Choose Your Azure Account Type
CloudYali will guide you to select your account type:
- Pay-as-You-Go (PAYG)
- Microsoft Customer Agreement (MCA)
- Enterprise Agreement (EA)
Not sure which account type you have?
The most reliable way to check is directly in the Azure portal:
- Go to Azure Portal → Cost Management + Billing
- Click Billing scopes in the left menu
- Select your billing account
- Look at the Account type field on the properties page
| What you see | Your account type | CloudYali setup |
|---|---|---|
| Account type: Microsoft Customer Agreement | MCA | MCA setup instructions |
| Account type: Enterprise Agreement | EA | EA setup instructions |
| No billing account visible, only subscriptions | PAYG | PAYG setup instructions |
For detailed instructions from Microsoft, see Check the type of your account.
If you're on a Cloud Solution Provider (CSP) agreement, please contact support@cloudyali.io for assistance. CSP accounts use a different billing model.
Step 3: Create a Service Principal
Create a Service Principal in Azure with appropriate permissions for your account type:
- PAYG: Requires Reader role at subscription level
- MCA: Requires Billing Account Reader role at billing account level
- EA: Requires Reader role at Management Group level, or Enrollment Reader at enrollment scope
For detailed instructions, refer to Creating an Azure Service Principal.
Step 4: Configure Cost Management Exports
Set up daily cost exports from Azure to a Storage Account:
- Create an Azure Storage Account
- Create a Blob container for cost exports
- Configure Cost Management Export with daily schedule
- Grant Service Principal access to the storage account
For detailed instructions, refer to Configuring Cost Management Exports.
Step 5: Add Account to CloudYali
In the CloudYali portal, fill in:
- Account Name: Friendly name (e.g., "Production")
- Account Type: PAYG / MCA / EA
- Subscription ID: Your Azure subscription ID
- Tenant ID: Your Microsoft Entra ID tenant ID
- Client ID: Service Principal application ID
- Client Secret: Service Principal password
- Storage Account Name: Name of your storage account
- Container Name: Name of blob container (e.g., cost-exports)
- Export Name: Name of your cost export
Step 6: Save Configuration
- Click Save or Connect
- CloudYali will begin syncing your cost data automatically
- Data will be available within 24 hours
Multi-Subscription Setup
If your organization has multiple Azure subscriptions, you have two options for connecting them to CloudYali:
Option A: Management Group Scope (Recommended)
Assign the Service Principal Reader role at the Management Group level. This automatically grants access to all subscriptions under that management group — including any new subscriptions added in the future.
# Get your Management Group ID
az account management-group list --query "[].{Name:name, Id:id}" -o table

# Assign Reader at Management Group level
az role assignment create \
  --assignee <SERVICE_PRINCIPAL_APP_ID> \
  --role "Reader" \
  --scope "/providers/Microsoft.Management/managementGroups/<MANAGEMENT_GROUP_ID>"
Advantages:
- New subscriptions are automatically included
- Single role assignment covers all subscriptions
- No per-subscription maintenance
Cost Management Export: You'll still need one export per subscription (Azure limitation). Configure exports in each subscription pointing to the same Storage Account and Container. Use the directory field to organize by subscription:
cost-exports/
├── subscription-prod/
├── subscription-staging/
└── subscription-dev/
Option B: Per-Subscription Scope
Assign the Service Principal Reader role on each subscription individually. Use this when you want to include only specific subscriptions.
# Repeat for each subscription
az role assignment create \
  --assignee <SERVICE_PRINCIPAL_APP_ID> \
  --role "Reader" \
  --scope "/subscriptions/<SUBSCRIPTION_ID_1>"

az role assignment create \
  --assignee <SERVICE_PRINCIPAL_APP_ID> \
  --role "Reader" \
  --scope "/subscriptions/<SUBSCRIPTION_ID_2>"
Remember: When adding a new subscription later, you must:
- Assign the Reader role on the new subscription
- Configure a Cost Management Export for the new subscription
- Grant Storage Blob Data Reader on the storage account (if using a per-subscription storage account)
Shared vs Separate Storage Accounts
| Approach | When to use |
|---|---|
| One shared Storage Account | Most setups. Simpler to manage. Use directory prefixes to organize by subscription. |
| Separate Storage Accounts per subscription | When subscriptions are in different regions and you want data locality, or when different teams own different subscriptions. |
Both approaches work with CloudYali. Enter all storage details when adding accounts in the CloudYali console.
Data Sync Timeline
After connecting your Azure account:
| Timeframe | What Happens |
|---|---|
| 0-24 hours | Initial data retrieval and processing begins |
| 24+ hours | Cost data becomes available in dashboards |
| 7+ days | Anomaly detection baseline is established |
| Daily | New cost data available (typically by 8 AM UTC) |
Azure Cost Management Exports include costs in the billing currency of your subscription (e.g., INR for India-based subscriptions, USD for US-based). CloudYali preserves the original billing currency in reports. If you have subscriptions billed in different currencies, CloudYali converts and displays all costs in USD for consistent cross-cloud reporting.
Account Type Prerequisites
Pay-as-You-Go (PAYG)
- No special prerequisites
- Service Principal needs Reader role on subscription
- Simple setup, typically 15-20 minutes
Microsoft Customer Agreement (MCA)
- "Azure charges" setting must be enabled at billing account level
- Service Principal needs Billing Account Reader role at billing account scope
- Verify in: Cost Management + Billing → Billing account properties
Enterprise Agreement (EA)
- Enterprise Admin must enable "Account Owner (AO) view charges" at enrollment level
- Service Principal needs Reader role at Management Group level, or Enrollment Reader at enrollment scope
- Contact your Enterprise Admin if this isn't enabled
Permissions Reference
For a complete list of required permissions and what CloudYali can and cannot access, refer to the Azure Permissions Reference.
Troubleshooting
Common Issues
Authentication Failed
- Verify Client ID, Tenant ID, and Client Secret are correct
- Check if Client Secret has expired
- Confirm Service Principal exists in Microsoft Entra ID
- Wait 5-10 minutes for role assignments to propagate
Cannot Access Storage
- Verify Service Principal has "Storage Blob Data Reader" role
- Check storage account name and container name match CloudYali configuration
- Ensure cost exports are being generated in Cost Management
No Cost Data Available
- Wait 24 hours for initial data sync
- Verify cost management export is configured and running
- Check export frequency is set to "Daily"
For more troubleshooting, refer to the complete Azure Cost Management Setup Guide.
Rotating Your Client Secret
Azure client secrets expire based on the expiration you set during creation (recommended: 12 or 24 months). You must rotate the secret before it expires to avoid data sync interruptions.
Step 1: Generate a New Secret in Azure
- Go to Azure Portal
- Navigate to Microsoft Entra ID → App registrations
- Select your
CloudYali-Billingapp - Go to Certificates & secrets
- Click + New client secret
- Set description:
CloudYali Integration (rotated YYYY-MM-DD) - Set expiration: 12 months / 24 months
- Click Add and copy the new secret Value immediately
The secret value is shown only once. If you navigate away without copying it, you'll need to create another new secret.
Step 2: Update the Secret in CloudYali
- Log in to CloudYali Console
- Go to Settings → Cloud Accounts
- Find your Azure account and click Edit
- Update the Client Secret field with the new value
- Click Save
Step 3: Verify the Connection
After updating:
- CloudYali will use the new secret on the next sync cycle
- Verify data is flowing by checking the account status (should show "Connected")
- If the status shows an error, wait 5-10 minutes for Azure role propagation
Step 4: Delete the Old Secret (Optional but Recommended)
Once you've confirmed the new secret works:
- Go back to Certificates & secrets in Azure
- Find the old secret and click Delete
Setting a Reminder
We recommend setting a calendar reminder 30 days before your secret expires. You can find the expiry date in:
- Azure Portal: Microsoft Entra ID → App registrations → CloudYali-Billing → Certificates & secrets
- CloudYali Console: Settings → Cloud Accounts → your Azure account details
Consider using Azure Key Vault with automatic rotation for production environments. This eliminates manual secret rotation entirely.
Next Steps
Once your Azure account is connected:
-
Wait for Baseline (7-14 days)
- CloudYali needs 7+ days of data to establish cost baselines
- Anomaly detection becomes more accurate over time
-
Set Up Budgets (Optional)
- Go to Budgets → + Create Budget
- Set monthly/weekly budget thresholds
-
Configure Notifications (Optional)
- Go to Settings → Notifications
- Set up Email or Microsoft Teams alerts
-
Tag Resources (Recommended)
- Tag Azure resources with Environment, Team, Project, etc.
- CloudYali uses tags for cost allocation and anomaly analysis
Need Help?
If you encounter any issues or need more assistance:
- Email Support: support@cloudyali.io
- Documentation: Check our Azure Cost Management Setup Guide
- Support Portal: https://support.cloudyali.io
Response Times:
- Email support: Within 24 hours
- Live chat: Immediate during business hours
- Critical issues: Within 4 hours